Technical Specification
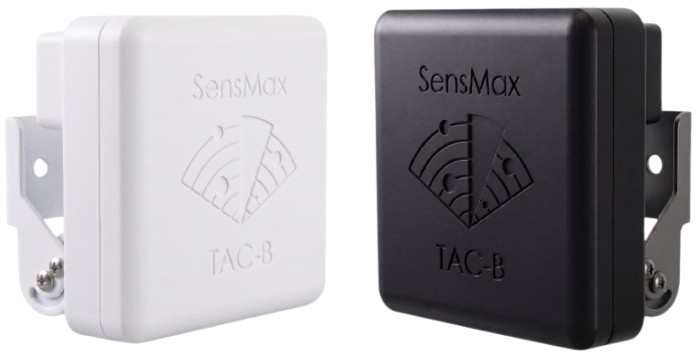
RADAR SENSOR SENSMAX TAC-B EWP
Description
The SensMax TAC-B EWP sensor uses contactless mmWave (millimeter wave) technology operating in the 60 GHz band. The sensor emits a scanning radio signal and receives reflections from objects.
SensMax TAC-B EWP can be used for reliable object detection in all lighting conditions, even in the presence of smoke, fog, or rain. The sensor is capable of detecting the slightest movements and has two operating modes: wall and overhead (the mode is selected in the settings; simultaneous use of both modes is not supported).
The device is enclosed in a durable polycarbonate casing with the maximum degree of dust and water protection (IP68), allowing it to be used both indoors and outdoors in severe weather conditions. Two color options are available for order: black and white. The sensor is equipped with a built-in metal bracket that rotates 180 degrees, providing convenient mounting of the device on both ceilings and walls.
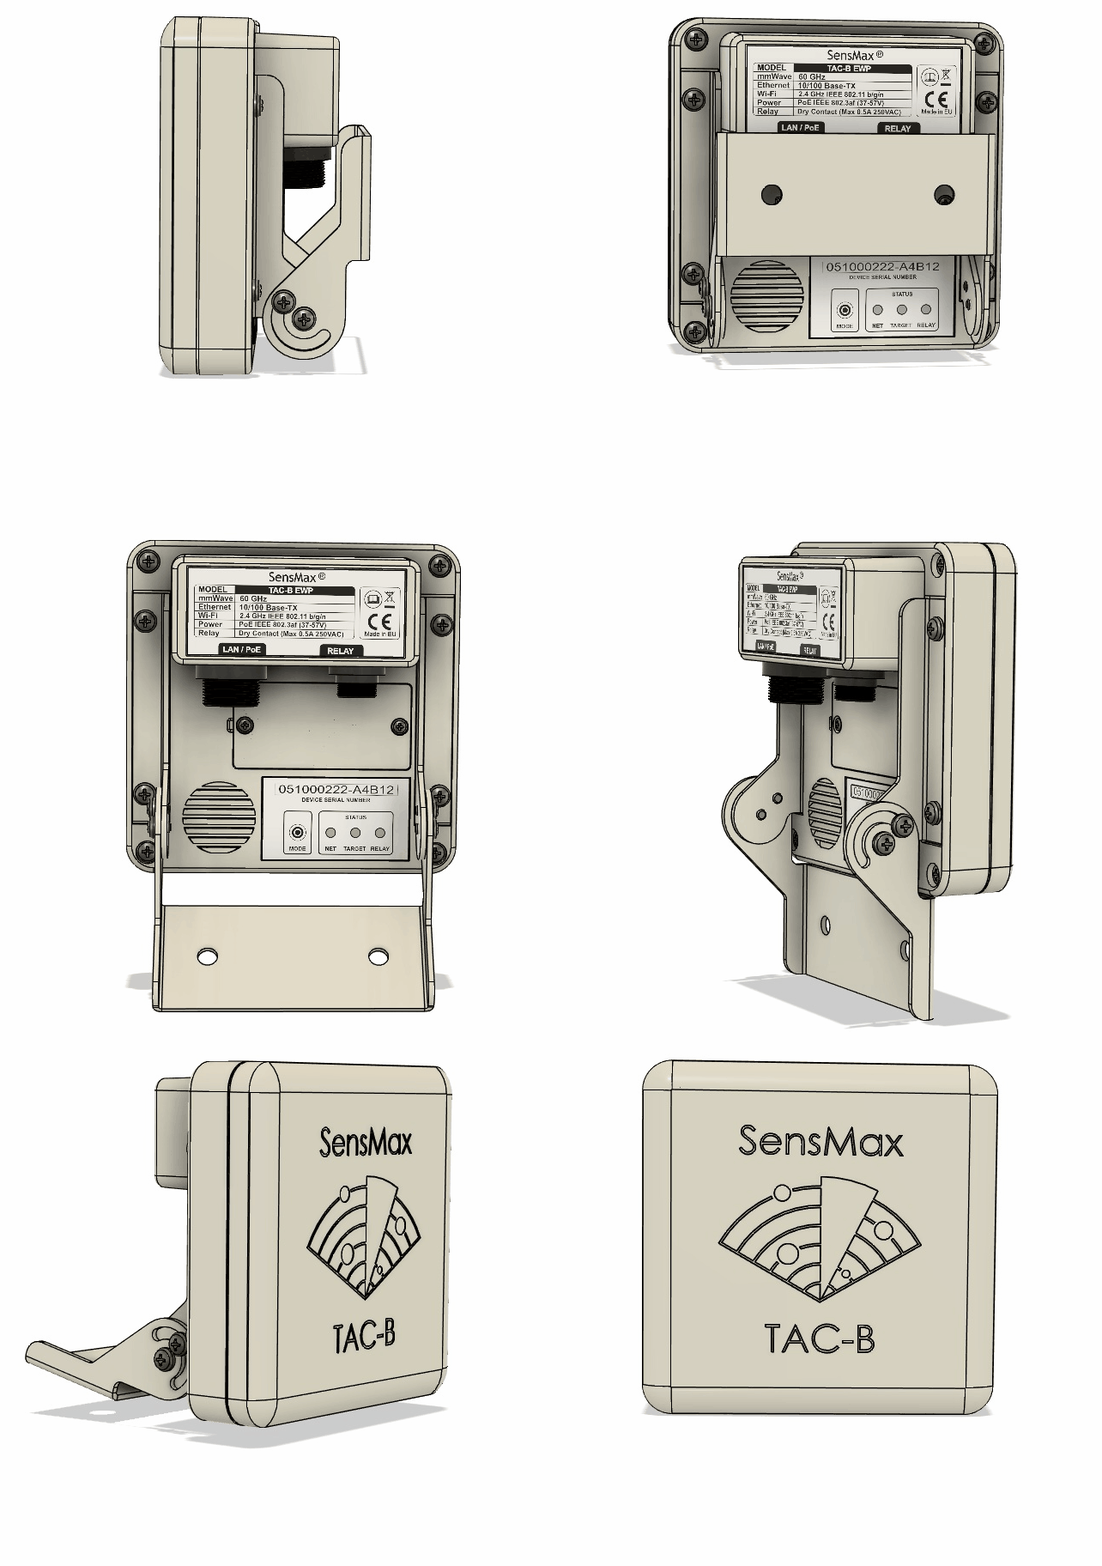
The device is equipped with a wide range of interfaces, including support for Ethernet with PoE (Power over Ethernet) technology and Wi-Fi, as well as a built-in dry contact relay for integration with external systems and a powerful speaker for audio notifications.
TAC-B EWP supports the popular IoT protocol MQTT, sending messages to Email and Telegram, saving data to an SD card, and can be fully operated autonomously.
Key features include:
- Two installation and object recognition modes:
- Wall mode: separation of moving objects into pedestrians and cyclists based on their speed.
- Overhead mode: separation of pedestrians into adults and children based on object height (cyclist recognition is not supported in this mode).
- Network capabilities and power: support for both Wi-Fi and wired Ethernet (10/100M) connections. PoE support (IEEE 802.3af, 37-57V) allows powering the device and transmitting data over a single cable.
- Built-in relay (Dry contact): allows configuring various automation scenarios, such as generating a short pulse every time an object crosses a line, or closing the contact for a specified time when a target number of counts is reached. Maximum switching load: 0.5A 250VAC (or 1A 30VDC for low-voltage circuits).
- Audio notifications: a built-in loud 2W speaker and mp3 format support allow playing loud audio warnings and notifications.
- Real-time 4D tracking: tracks objects in four dimensions: X, Y, Z coordinates, and speed.
- Object counting: precise counting of visitors within user-defined lines and zones. The intelligent algorithm eliminates double-counting of the same object.
- Privacy: collects exclusively anonymous data, ensuring 100% compliance with GDPR and privacy laws.
- Offline operation: ability to work offline, saving data to a built-in Micro SD card and uploading it to the server when network connection is restored.
- Flexible notifications and reports: built-in sending of system notifications and reports via Email, Telegram, and MQTT.
Application
The TAC-B EWP sensor can be used for:
- counting people in various passages and zones
- outdoor counting of pedestrians and cyclists
- room occupancy monitoring
- dwell time measurement
- building automation (smart home) and interaction with external devices via the built-in relay
- smart city projects
- security systems and audio notifications (using the built-in speaker)
Operating Modes
The sensor supports two operating modes, which are selected via software in the web interface.
Note
The sensor is universal - you can change its installation location and switch the operating mode in the settings an unlimited number of times at any moment. The only limitation: the device cannot operate in wall and overhead modes simultaneously.
| Parameter | Wall Mode | Overhead Mode |
|---|---|---|
| Installation height | 2-3.5 m (recommended minimum height is 2 m) | 2-3.5 m (recommended minimum height is 2 m) |
| Detection area dimensions | 120° field of view | 106° field of view |
| Object classification | Pedestrian / Cyclist | Child / Adult |
| Application | Indoor and outdoor | Indoor and outdoor |
Field of View (FOV)
The size of the effective object detection area depends on the selected operating mode.
- Wall mode: the radar has a horizontal field of view of 120° and a vertical field of view of 60°. The maximum detection range is up to 10 meters.
-
Overhead mode: the radar is pointed strictly downwards and has a 106° field of view. The shape of the basic coverage area on the floor is a circle, the diameter of which is calculated automatically and directly depends on the sensor's installation height:
- up to 3.5 m at an installation height of 2 m (200 cm).
- up to 7.5 m at an installation height of 3.5 m (350 cm).
Zone limits when classifying objects (adult/child) To correctly classify an object by height, the radar needs to reliably capture the top of the person's head. If a person is on the edge of a wide coverage area, their head may not fall within the radar's field of view cone. In this case, the tracker sees only the torso or legs, and may mistakenly consider an adult a child.
To avoid errors, when classification is enabled, the algorithm calculates a reduced effective zone, in which the head of an adult (average height 1.7 m) is guaranteed to be within the field of view cone. Thus, the effective diameter of the monitoring zone is:
- 2 m at the minimum recommended installation height of 2 m (200 cm).
- 4.8 m at the maximum recommended installation height of 3.5 m (350 cm).
Technical Specifications
| Parameter | Value |
|---|---|
| Operating conditions | Indoor / Outdoor |
| Technology | 60 GHz mmWave radar |
| Counting accuracy | >99% (at a density of 1 person per sq. m) |
| Viewing angle and range | Wall mode: 120° horizontal, 60° vertical; range up to 10 m Overhead mode: 106° (depends on the installation height) |
| Object classification | Wall mode: pedestrians / cyclists (by speed) Overhead mode: adults / children (by height) |
| Max object speed | Wall mode: up to 35 km/h Overhead mode: up to 12 km/h |
| GDPR privacy | 100% compliant (ensures complete anonymity) |
| Notifications and reports | Built-in reports and notifications via Email and Telegram. MQTT support |
| Internet connection | Wi-Fi 2.4 GHz (WPA2-PSK / WPA2-ENTERPRISE) Ethernet 10/100 Mbps |
| Relay (output) | Dry Contact. Maximum switching load: 0.5A 250VAC or 1A 30VDC |
| Speaker | 2 W |
| Data storage | Micro SD memory card 8 GB |
| Power supply | PoE (IEEE 802.3af, 37-57V) |
| Operating temperature | -25...+65°C |
| IP protection class | IP68 |
| Casing material | Polycarbonate |
| Casing color | Black or white |
| Mounting | Built-in metal bracket (180° rotation), for wall or ceiling installation |
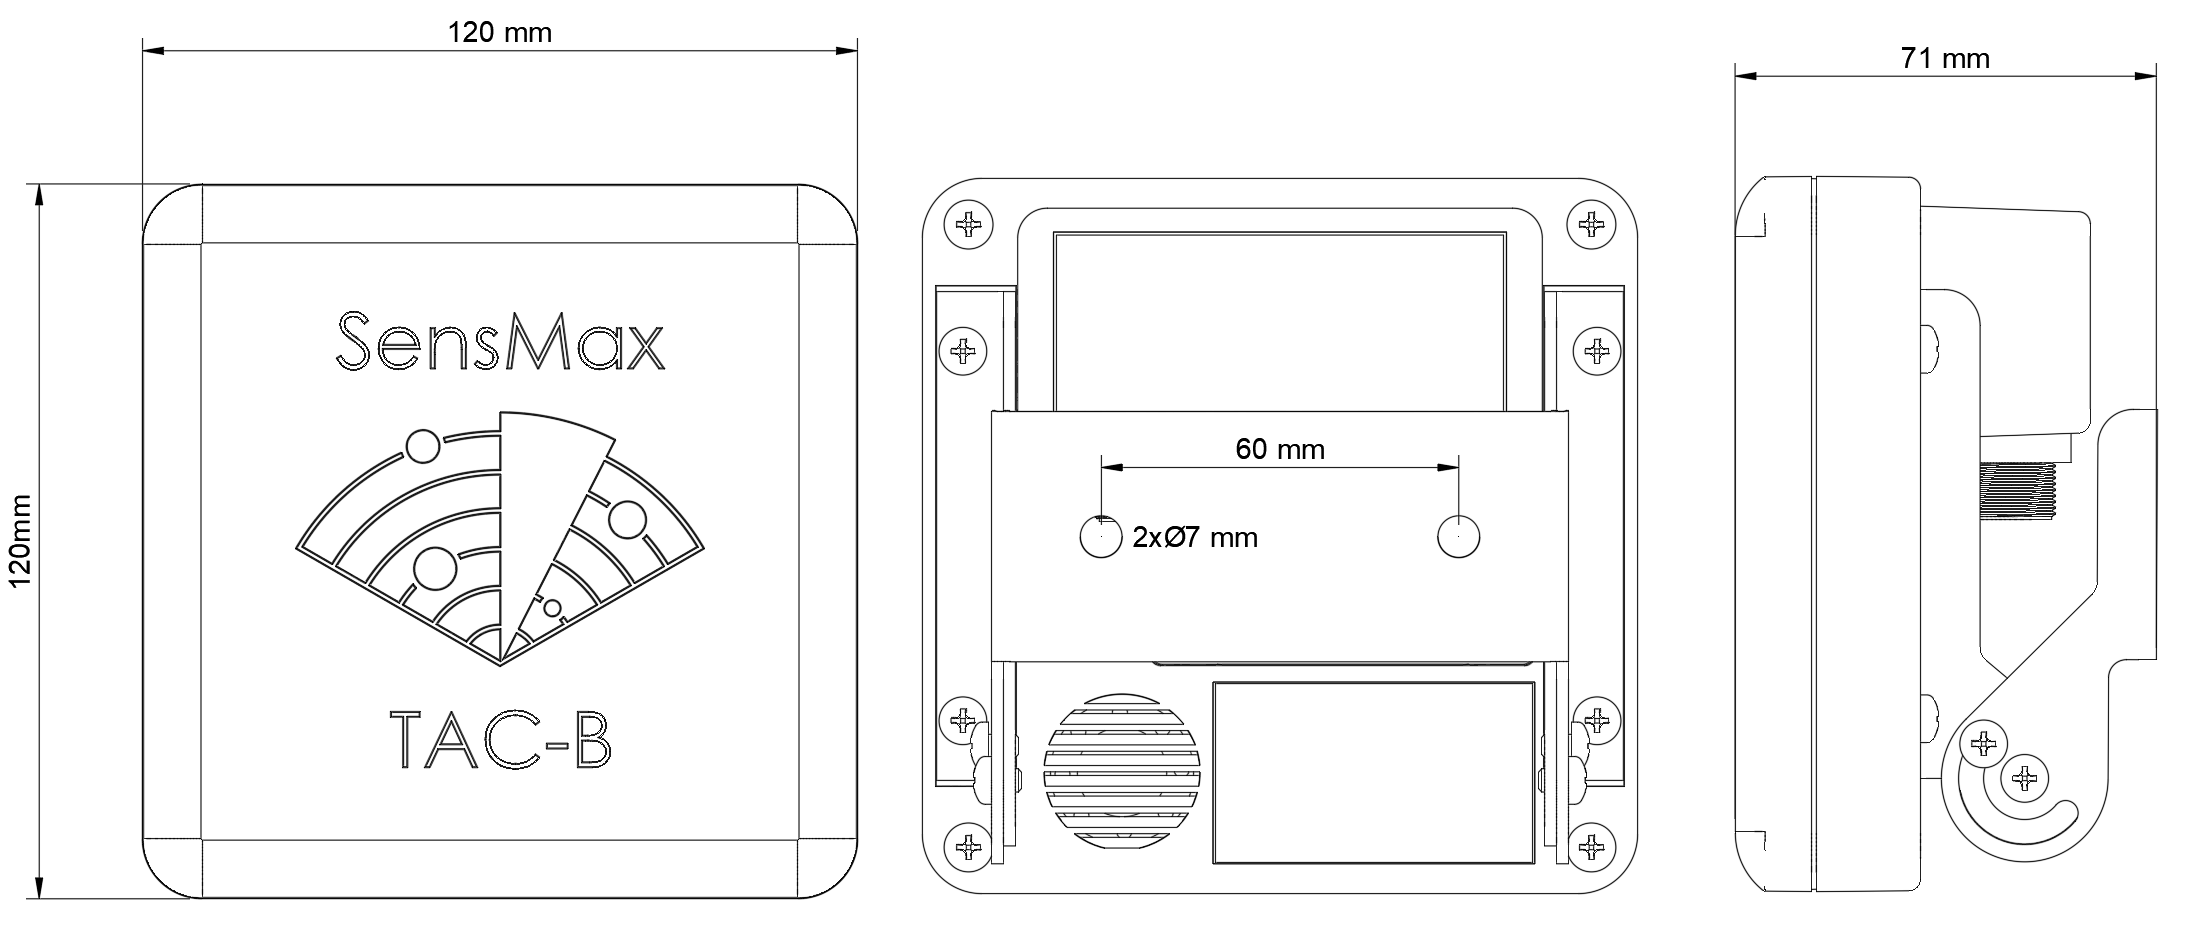
| Dimensions | 120 × 120 × 71 mm |
| Weight | 450 g |
Network Requirements and Used Ports
To ensure full functionality of the radar counters and their proper interaction with cloud services, the local server, and time services, it is necessary to make sure that the Firewall at the installation site allows outbound connections on the following ports:
1. Mandatory Ports for Basic Operation
These ports are critical for the secure data transmission and functioning of built-in security mechanisms (SSL/TLS).
-
Port 123 (UDP) - NTP Protocol
- Purpose: Synchronization of the device's system time (by default with
pool.ntp.orgservers). - Importance: Critical. Without accurate time, the device will not be able to validate SSL/TLS certificates, resulting in the inability to establish a secure connection with the server via MQTTS and HTTPS protocols, as well as incorrect timestamps in the transmitted data.
- Purpose: Synchronization of the device's system time (by default with
-
Port 8883 (TCP) - MQTTS Protocol (MQTT over SSL/TLS)
- Purpose: The main channel for the secure transmission of collected data (statistics) to the SensWeb cloud or a user MQTT broker that uses encryption.
2. Additional Ports (Depending on Configuration)
These ports must be opened if you plan to use the corresponding device functions.
-
Port 443 (TCP) - HTTPS Protocol
- Purpose:
- Receiving over-the-air (OTA) firmware updates.
- Sending data to third-party servers using Webhooks.
- Integration with messengers (e.g., sending service notifications to Telegram).
- Purpose:
-
Port 1883 (TCP) - MQTT Protocol (Unencrypted)
- Purpose: Data transmission to a local or remote user MQTT broker without using SSL/TLS (applicable only if the corresponding connection type is selected in the device settings).
Note for System Administrator
The device acts as the initiator of all the network connections mentioned above (it works as a client). Configuring port forwarding for inbound connections from an external network (WAN to LAN) is not required.
Dimensions
The sensor is housed in a compact casing, making it convenient for mounting in limited space conditions.
- Device dimensions: 120 × 120 × 71 mm
- Weight: 450 g
Package Contents
The standard package includes everything needed for a basic installation:
- SensMax TAC-B EWP radar sensor
- Ethernet cable (length 5 meters)
- Set of mounting screws
- Waterproof cover for the RJ-45 connector
- Waterproof female connector for connecting to the relay terminal
Note
The sensor is equipped with a built-in metal bracket that allows you to install the device on either a wall or a ceiling without purchasing additional mounts.
Optional Accessories
The following accessories are not included in the standard package and are purchased separately if necessary:
- PoE Injector (Adapter) - required to power the device if your router or switch does not support the PoE standard.
- Additional Bracket - a specialized mount for installing the sensor on poles and round pillars (see details in the Mounting Bracket article).
Sensor Elements
Rear view
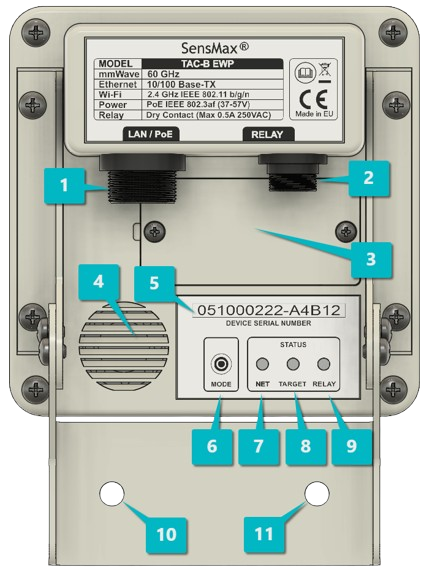
| Diagram number | Component | Description |
|---|---|---|
| 1 | RJ-45 connector | Port for power connection (PoE) and wired network connection (Ethernet). |
| 2 | Relay connector (2 pins) | Output of the built-in dry contact relay. |
| 3 | Micro SD slot cover | Removable cover for accessing the memory card slot. |
| 4 | Speaker | Built-in speaker for playing audio notifications. |
| 5 | Serial number | Information sticker with the device's serial number. |
| 6 | Mode button | Service button. |
| 7 | NET indicator (green) | LED for displaying the network connection status. |
| 8 | TARGET indicator (yellow) | LED for indicating the detection of objects in the control zone. |
| 9 | Relay status indicator (red) | LED showing the current status of the built-in relay. |
| 10, 11 | Mounting holes | Holes in the built-in bracket for securing the sensor to a surface. |
Electrical Wiring Diagram
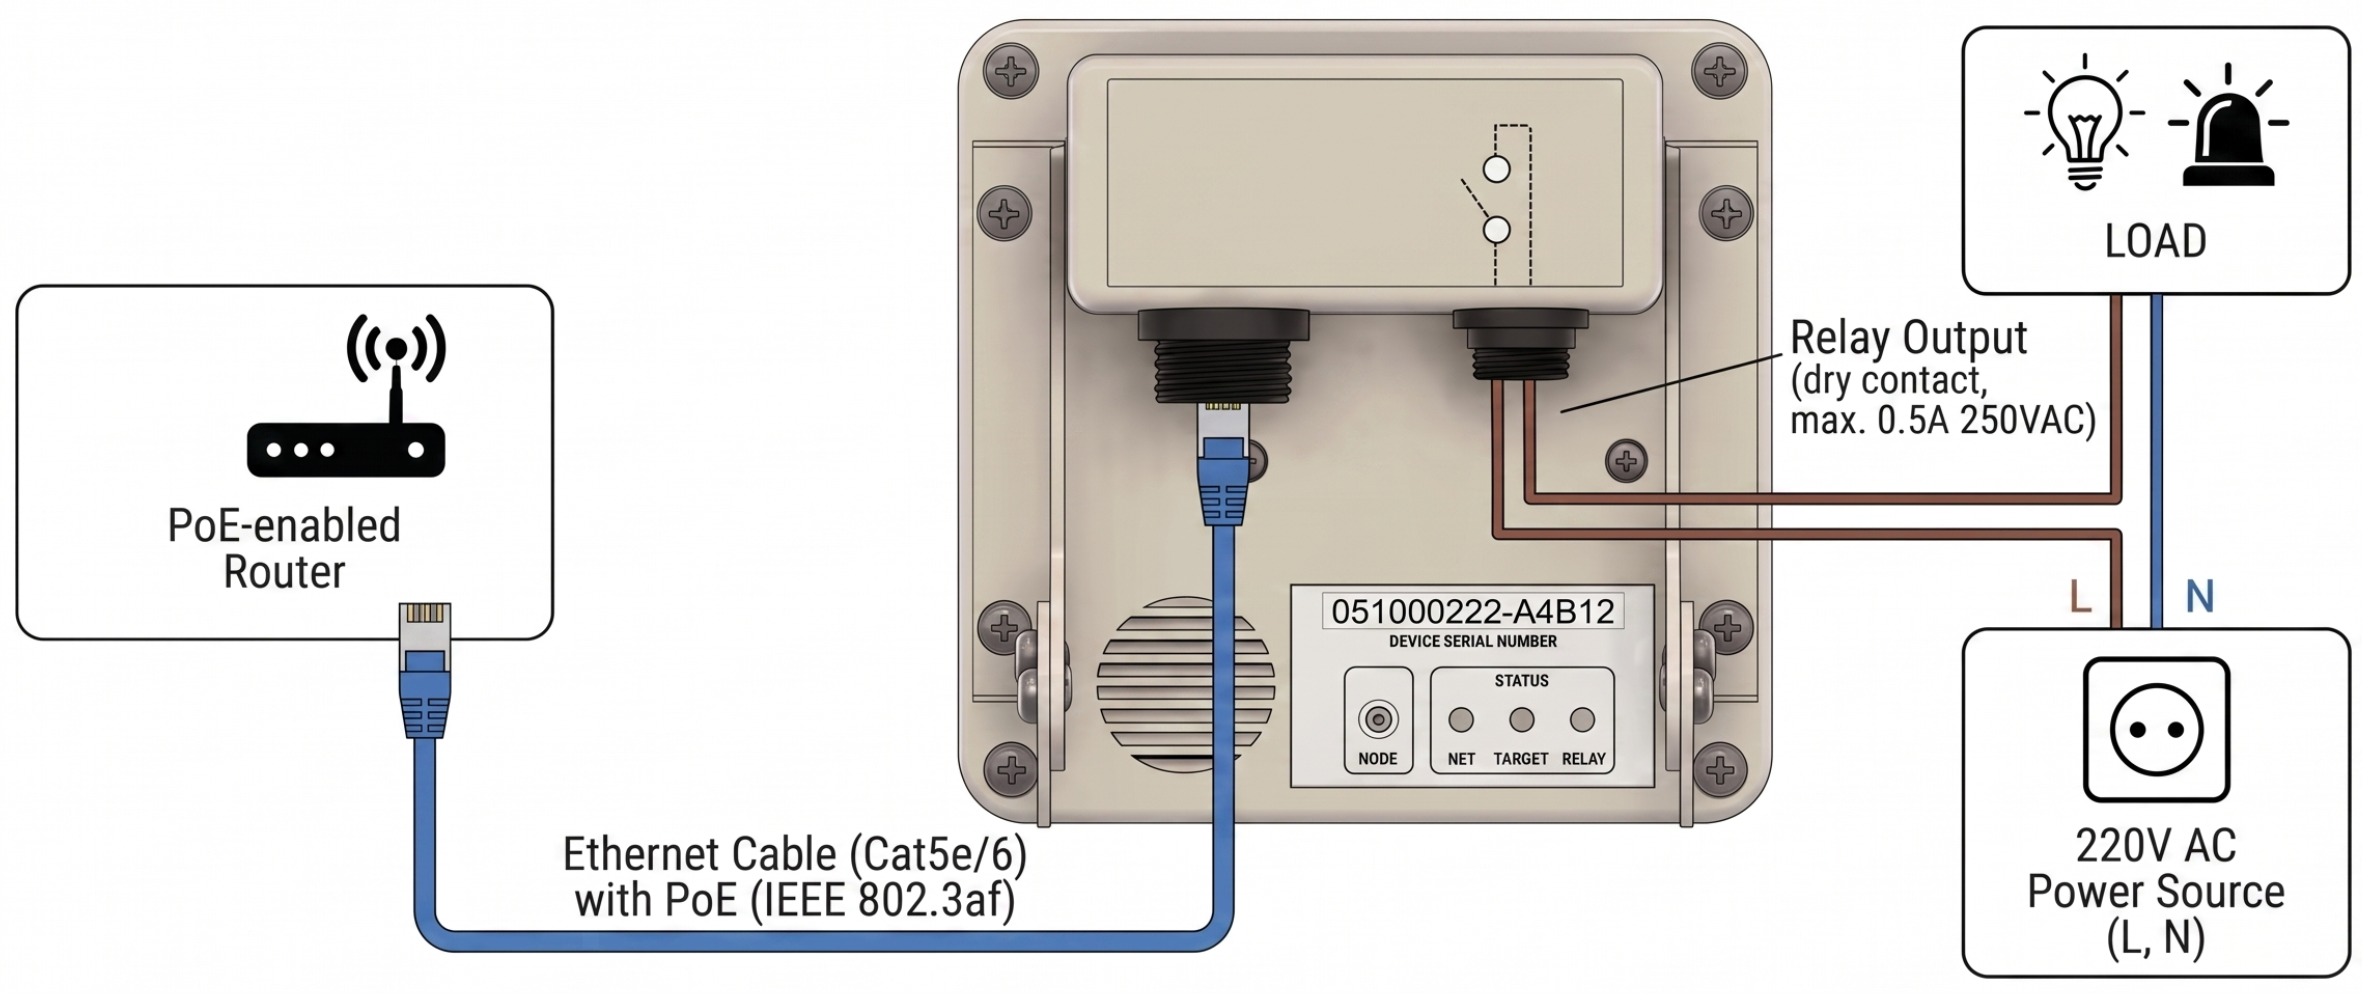
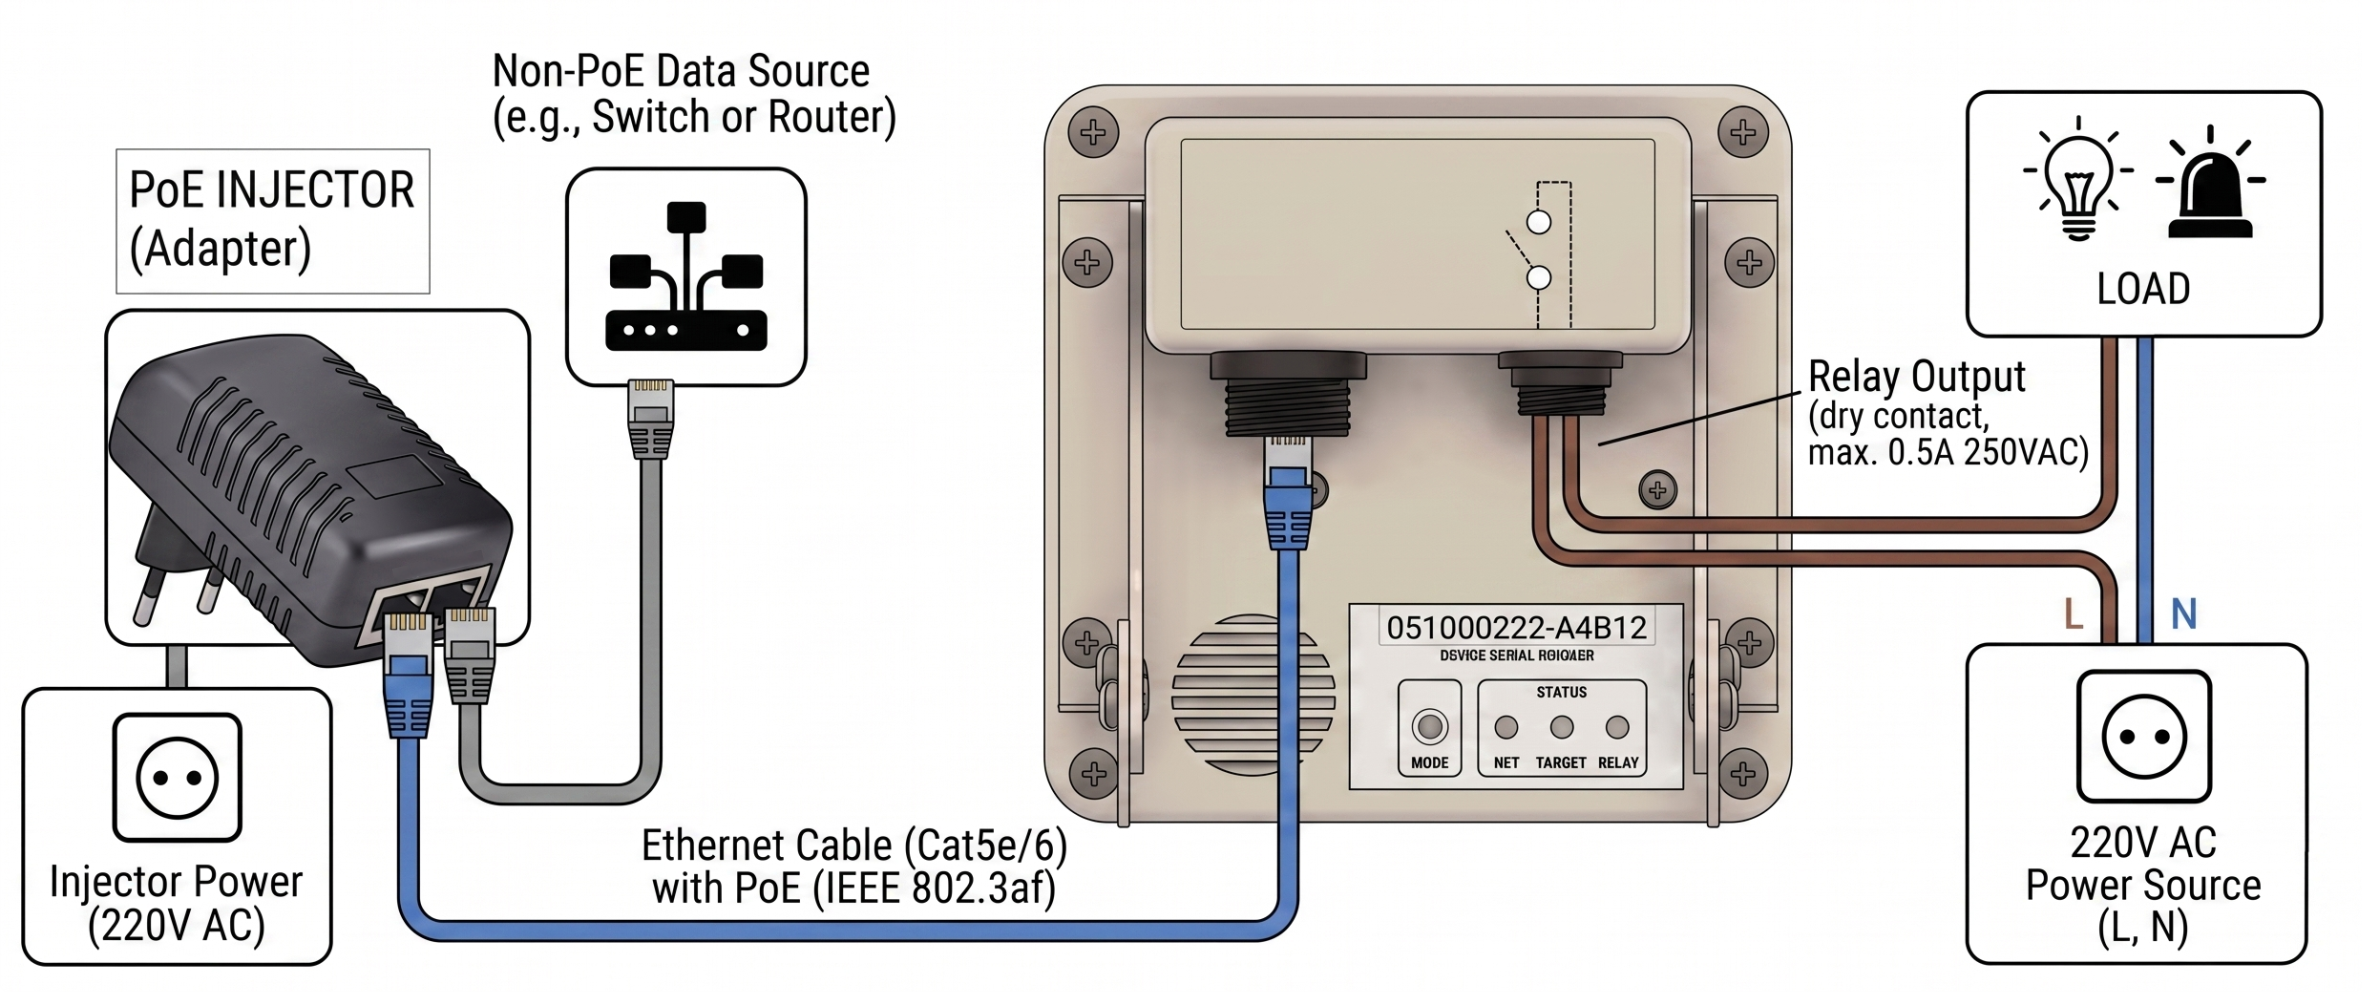
Power and data transmission for the SensMax TAC-B EWP sensor are provided over a single Ethernet cable using PoE (Power over Ethernet) technology.
The device can be connected in two ways:
- Directly to a PoE router or switch, if the network equipment supports the PoE standard.
- Through an external PoE injector (adapter), if the router or switch does not support power delivery over twisted pair.
Attention: A PoE injector (adapter) is not included in the standard device package and must be purchased separately.
Connecting directly to a PoE router
Connecting using a PoE injector
Mounting and Positioning
Choosing the Installation Height
For the sensor to function correctly and recognize objects accurately, it must be installed at the optimal height:
- Wall mode: The optimal installation height is 250 - 350 cm from the floor level.
- Overhead mode: The optimal installation height is 200 - 300 cm from the floor level.
Attention: Observing the recommended installation height is critical for the proper functioning of intelligent object classification algorithms (e.g., distinguishing adults from children or pedestrians from cyclists).
Installation Procedure
To mount the sensor, it is recommended to perform the following sequence of actions:
- Dismantling the bracket: Unscrew the four fixing screws and remove the upper mounting plate from the sensor bracket.
- Attaching the plate: Securely fasten the mounting plate to the wall or ceiling (depending on the required operating mode) using screws at the chosen height from the floor.
-
Connecting cables: Connect the cables to the sensor.
Attention
If the installation is outdoors, it is strongly recommended to use the waterproof connector covers (included in the package).
-
Installing the sensor: Attach the sensor to the mounted bracket using the screws.
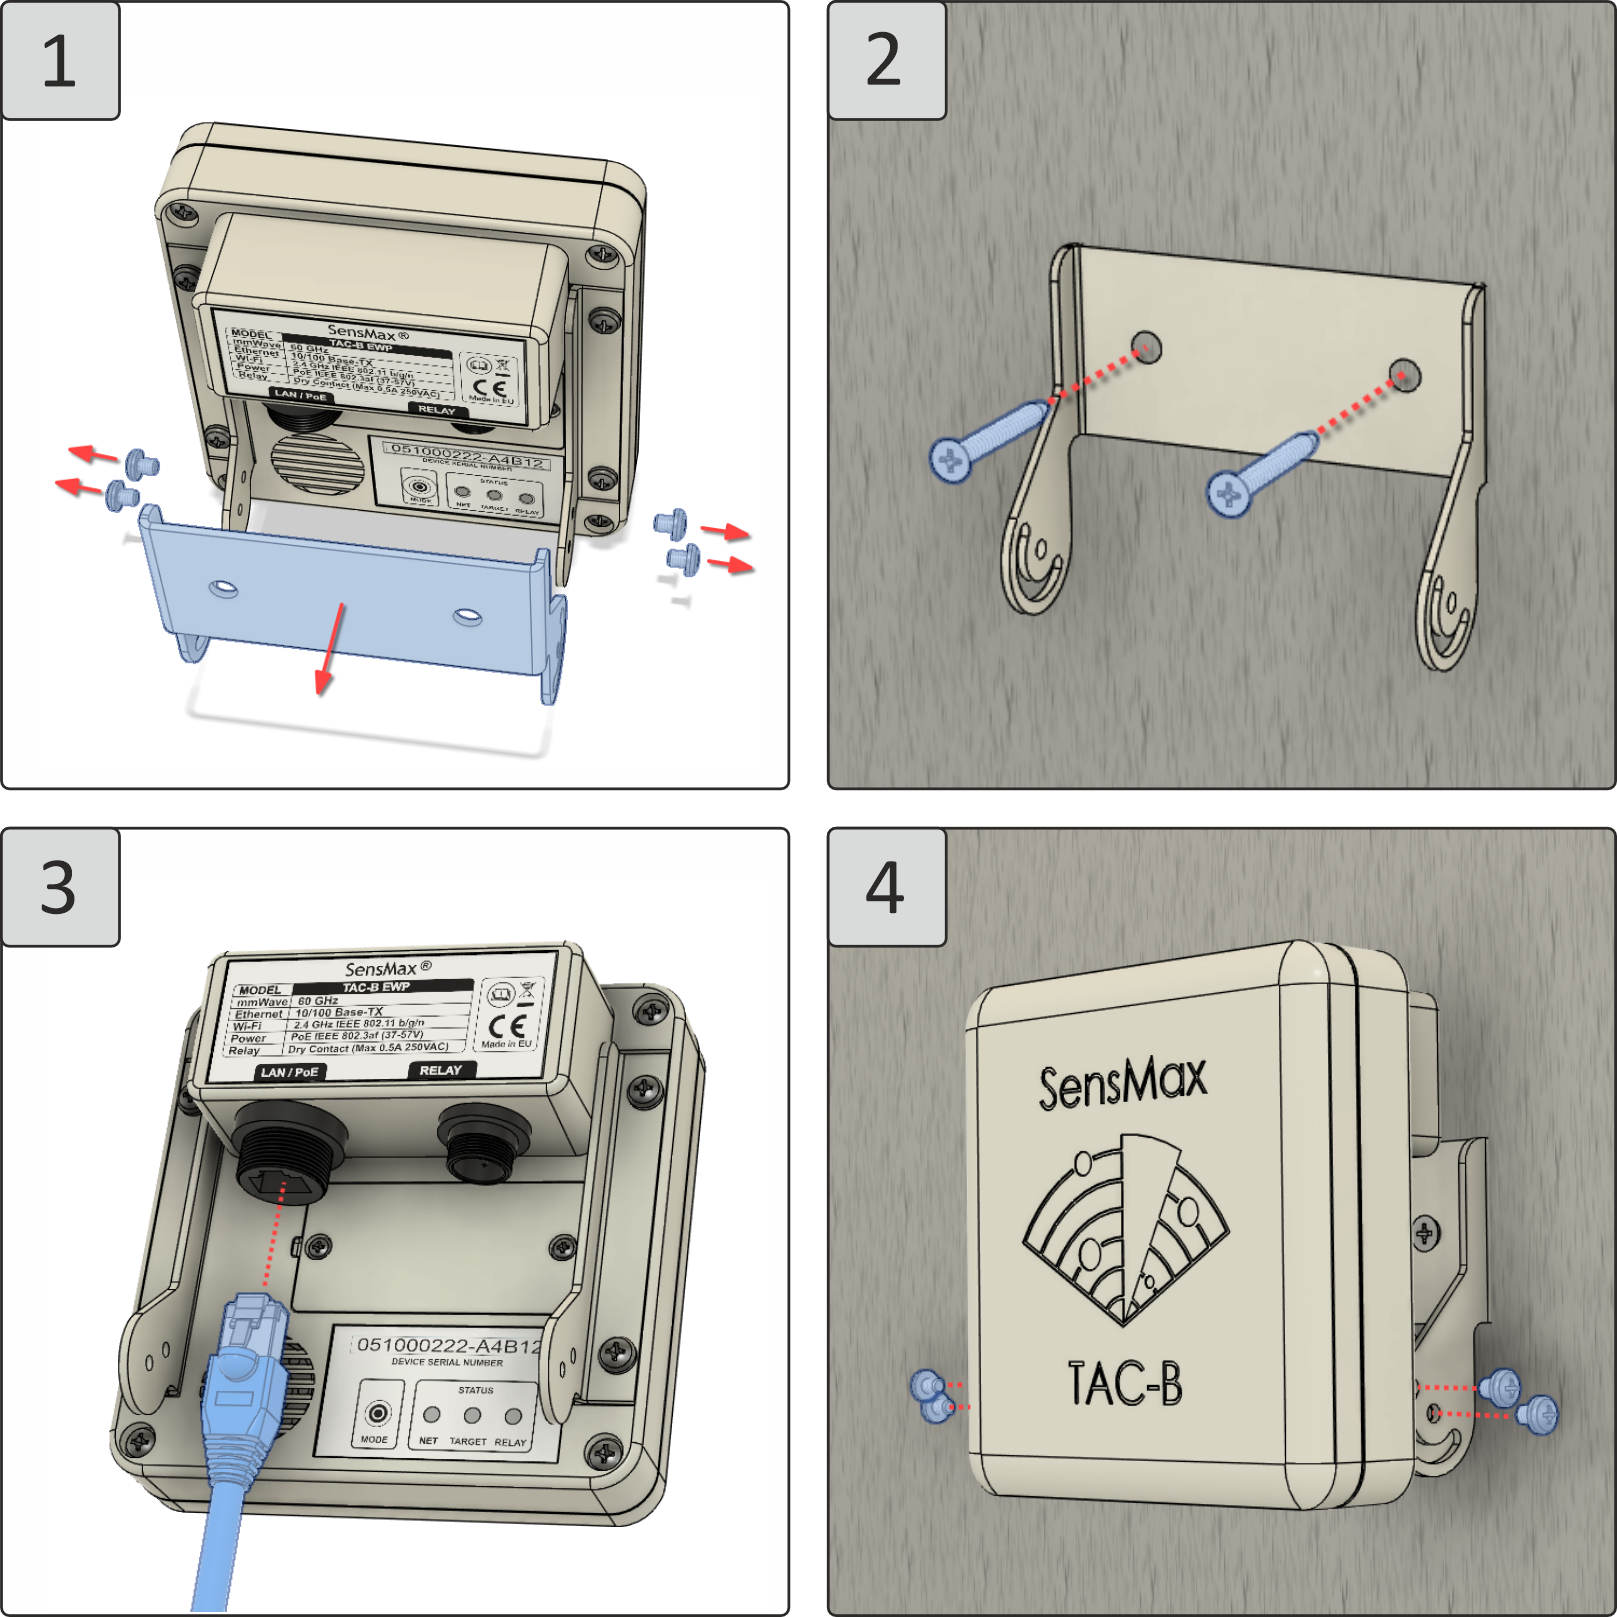
Positioning
After the sensor is mounted, it must be positioned according to the selected operating mode. Loosen the bracket's fixing screws and set the required tilt of the device.
Wall Mounting
In this mode, the sensor points away from the wall and registers objects passing by.
-
The radar beam should be directed above people's heads.
-
If the installation height exceeds 2 meters, a slight downward tilt of 10-15 degrees is recommended. This improves the detection of distant objects.
-
Do not tilt the sensor too much; otherwise, near objects will block distant ones.
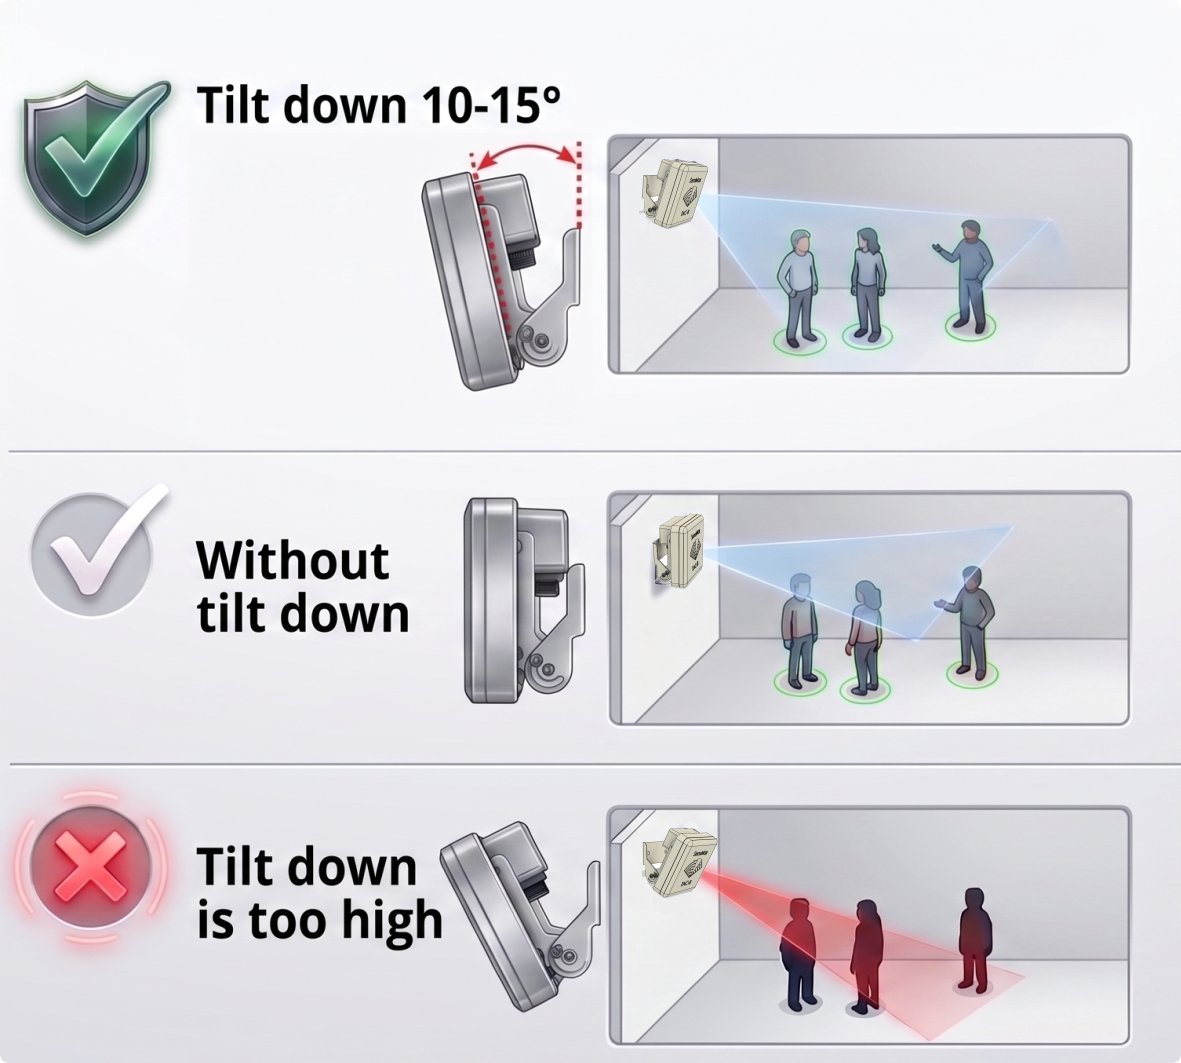
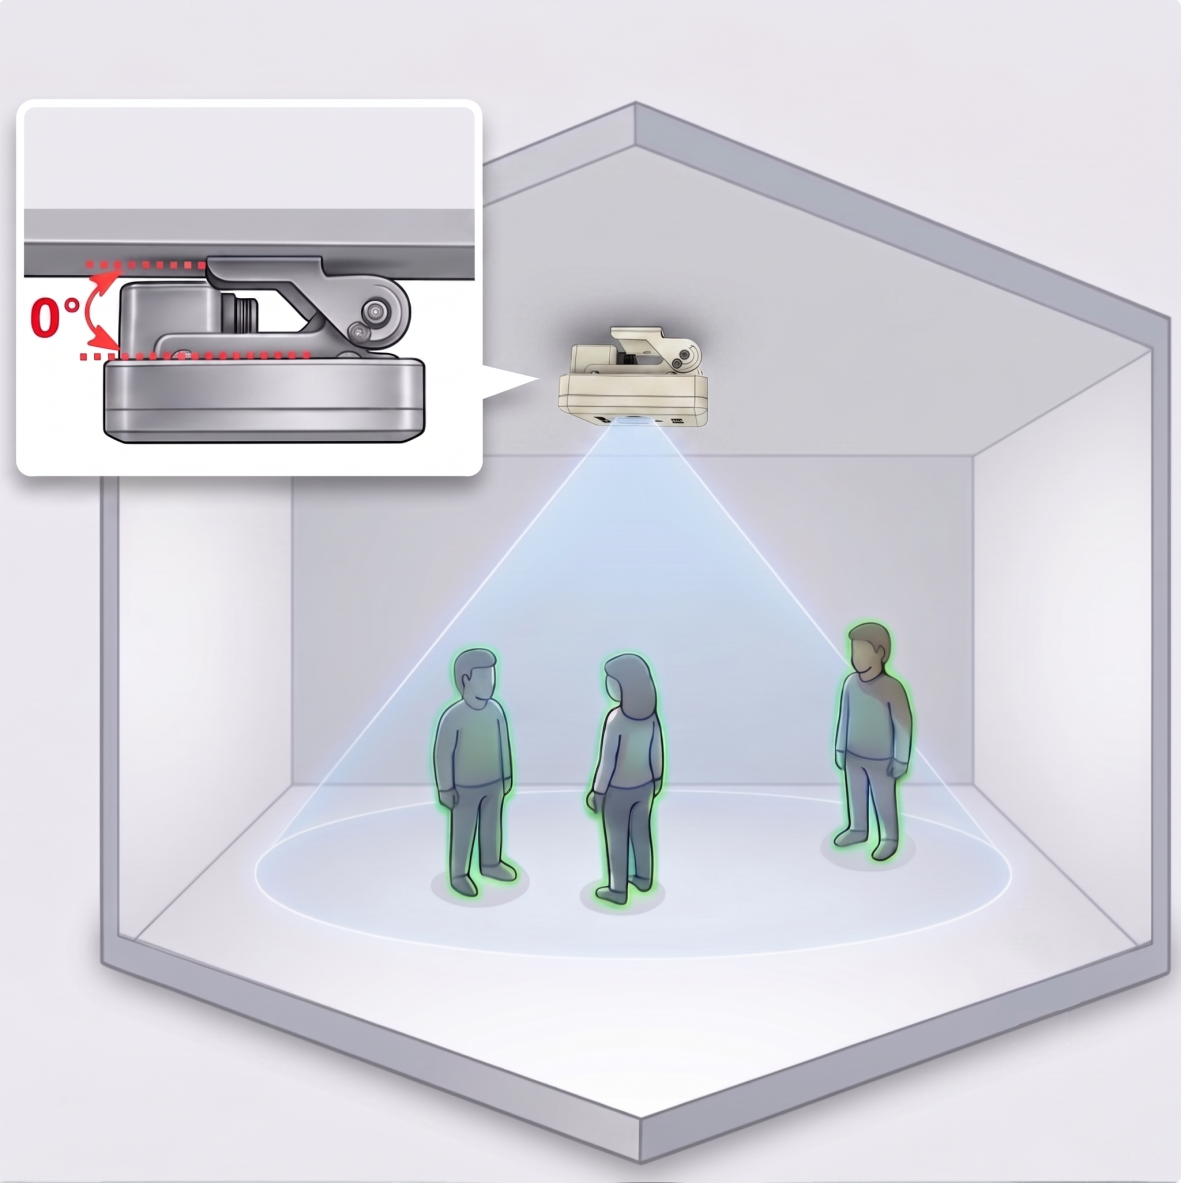
Overhead Mounting
In this mode, the sensor points downwards and registers objects directly beneath it. The sensor's plane must be oriented strictly parallel to the floor and pointing directly downward (0-degree angle).
Connecting to the Sensor and Accessing Settings
By default, the sensor is configured to automatically obtain an IP address (DHCP) and supports the mDNS protocol. Once the Ethernet cable is connected, the device is immediately ready for configuration. To access the web interface, use a computer or mobile phone connected to the same local network as the sensor.
Method 1: Connection via Local Network (mDNS)
- Open a web browser.
-
In the address bar, enter the address in the format
http://<serial_number>.local, where<serial_number>is the serial number of your sensor (digits only, without the verification code).- Example:
http://051001313.local
- Example:
Method 2: Connection via Built-in Wi-Fi Access Point (AP)
If a direct connection over the local network is not available, you can configure the sensor via its own Wi-Fi network:
- Search for available Wi-Fi networks on your laptop or mobile phone.
-
Connect to the sensor's access point. The network name (SSID) has the format
SensMax TAC-B XXXXXXXXX.- The default password is the same as the device's serial number.
- Example: for the network
SensMax TAC-B 051001313, the password will be051001313. - Open a web browser.
- Enter the IP address
192.168.10.1into the address bar and press Enter.
Authorization in the Web Interface
Regardless of the selected connection method, you will see the settings login page.
- Enter the password to unlock the interface.
- Default password: the sensor's serial number (digits only, e.g.,
051001313).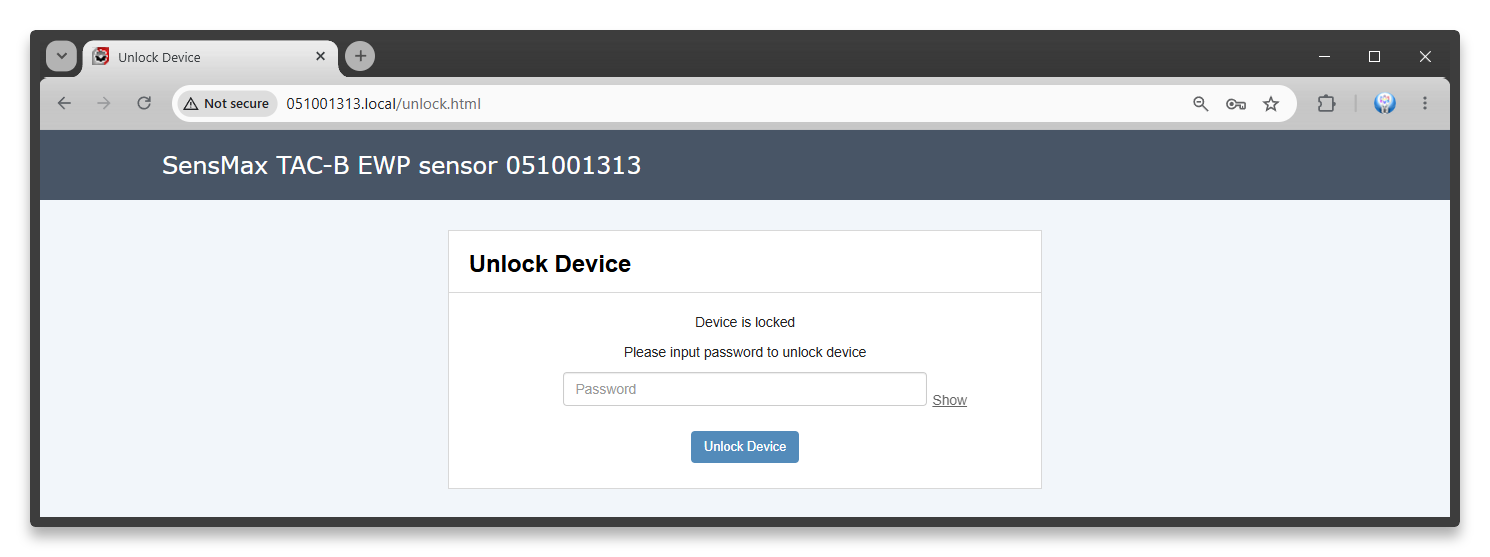
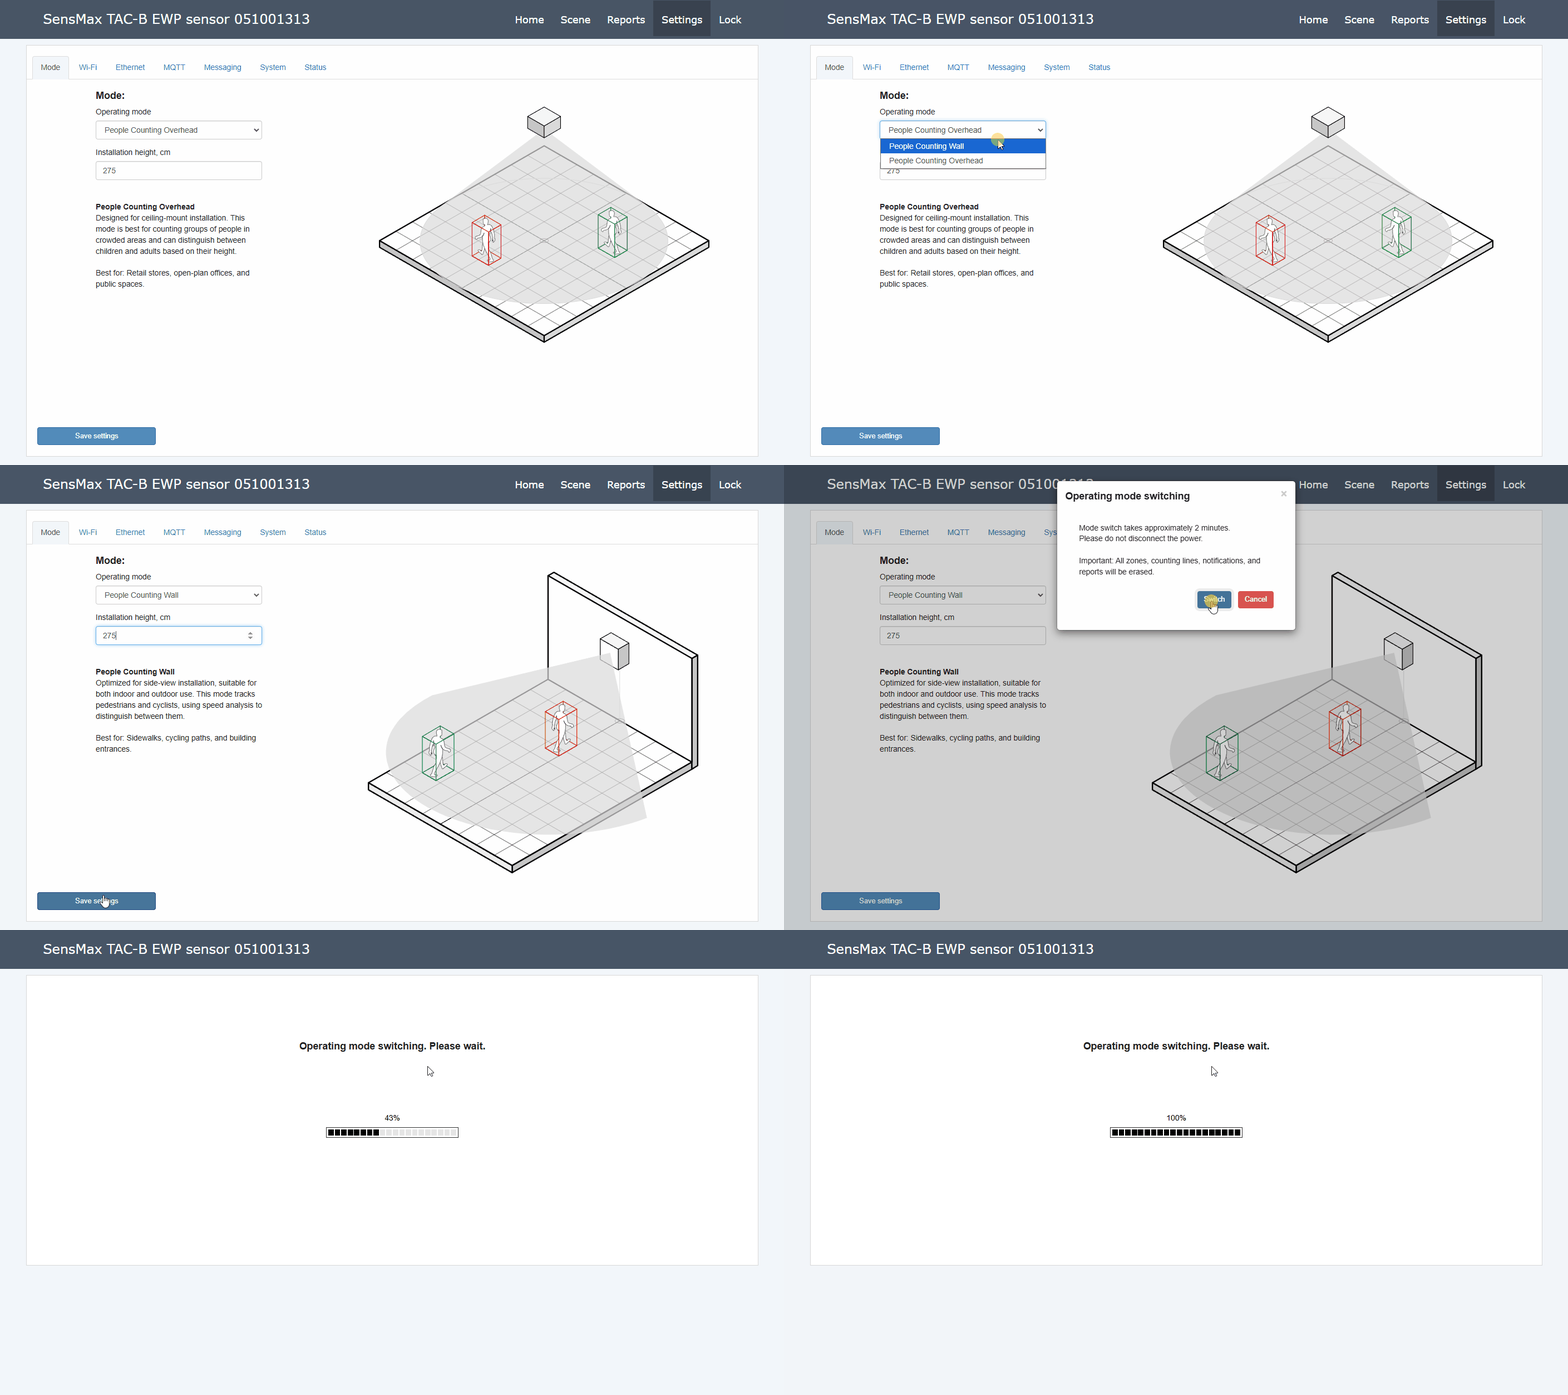
Switching the Operating Mode
You need to select the sensor's operating mode according to its intended application:
- Go to the Settings page and open the Mode tab.
- Select the required operating mode from the drop-down list.
- Specify the installation height of the sensor from the floor (in centimeters).
- Click the Save settings button.
Attention
The process of switching the mode takes about two minutes. Please do not turn off the device's power during this time.
Important
If you have worked with the sensor before and created zones, counting lines, notifications, or reports - all these custom settings will be deleted when you switch the operating mode.
Further Configuration
For a detailed configuration of counting parameters, network connections, and reports, select the guide corresponding to the installed operating mode:
Once the setup is complete, the sensor will immediately begin its operation. You can monitor the current situation, check counting accuracy, and generate reports directly through the built-in web interface, as well as integrate the device with the SensWeb cloud portal or your own IT system.
We wish you successful operation of the SensMax TAC-B EWP! If you have any questions, you can always contact our technical support service for assistance.
Contacts
- Phone: +371 67553110
- Email: office@sensmax.lv
- Website: www.sensmax.eu
- Telegram: t.me/sensmax
- Facebook: facebook.com/sensmaxmanufacturer
- LinkedIn: linkedin.com/company/sensmax
SensMax is a registered trademark. SensMax reserves the right to make changes to the products described herein without prior notice. The information contained in this publication regarding device applications and the like is provided solely for your convenience. SensMax disclaims all liability arising from this information and its use. The use of SensMax devices in life-support and/or safety-critical applications is entirely at the buyer's risk, and the buyer agrees to defend, indemnify, and hold harmless SensMax against any and all damages, claims, suits, or expenses arising from such use. No licenses are conveyed, implicitly or otherwise, under any intellectual property rights of SensMax.