SMX DATA COLLECTORS FAMILY
📥 Download PDF description (EN)
Description
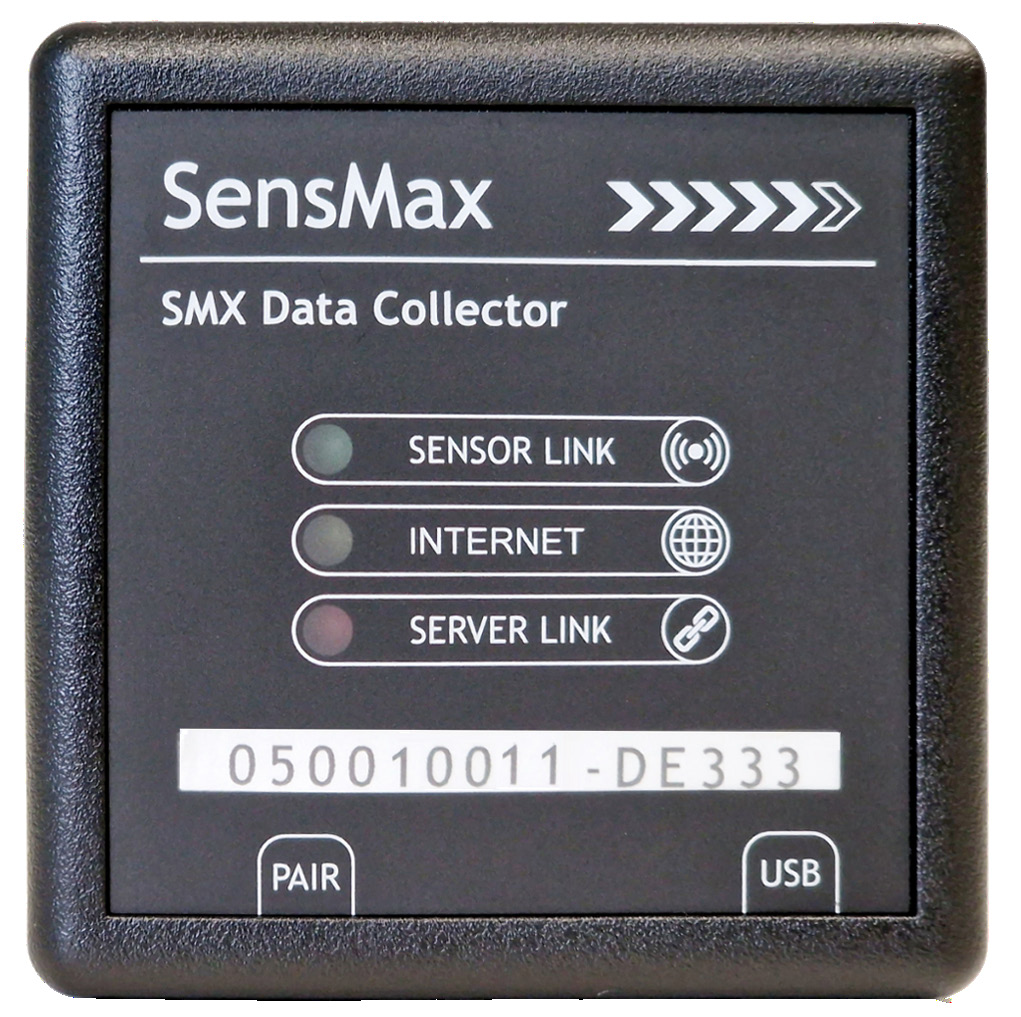
SensMax SMX data collectors are advanced devices designed to collect data from SensMax sensors over a radio channel. These collectors serve as the central hub in a wireless sensor network, aggregating data from multiple sensors from various locations. After collecting data, SensMax SMX devices transmit the information to a central server via Wi-Fi or Ethernet, offering flexible connectivity options for various environments and infrastructures.
By supporting the MQTT protocol, these collectors provide reliable real-time data transmission, making them ideal for IoT applications, smart buildings, and remote monitoring systems.
Key features include:
- Wireless data collection from SensMax sensors via radio channel.
- Flexible connectivity via Wi-Fi or Ethernet.
- Support for MQTT protocol for lightweight and efficient data transfer.
- Real-time data transmission to a central server.
Radio frequency options (868 / 915 / 920 MHz)
By default, all LR and SLR series devices (both sensors and collectors) are supplied configured to a frequency of 868 MHz. For regions with other radio frequency standards (USA, Asian countries, etc.) or upon special request, we produce modifications operating at frequencies of 915 MHz and 920 MHz.
Models comparison
| Parameter | SensMax SMX PRO | SensMax SMX LR | SensMax SMX SLR | SensMax SMX LR TS | SensMax SMX SLR TS |
|---|---|---|---|---|---|
| Range | 20-50 m | 150-250 m | Up to 1000 m | 150-250 m | Up to 1000 m |
| Data format | 24 hours, step 1 hour | 24 hours, step 1 hour | 24 hours, step 1 hour | 24 hours, step 5 min / each visitor time mark | 24 hours, step 5 min / each visitor time mark |
| Data delivery | Scheduled | Scheduled | Scheduled | Instant / Scheduled | Instant / Scheduled |
| Server protocol | MQTT / SensMax | MQTT / SensMax | MQTT / SensMax | MQTT / SensMax | MQTT / SensMax |
Technical specifications
All devices support Ethernet and Wi-Fi 2.4 GHz WPA2-PSK connection.
Ethernet connection has priority. When connecting an RJ-45 network cable to the network, the SensMax SMX data collector will automatically begin using it. If the Ethernet network is not available, the device will switch to the selected Wi-Fi network to connect to the Internet.
| Parameter | SensMax SMX PRO | SensMax SMX LR | SensMax SMX SLR | SensMax SMX LR TS | SensMax SMX SLR TS |
|---|---|---|---|---|---|
| Radio frequency | 2.4 GHz | 868, 915, 920 MHz* | 868, 915, 920 MHz* | 868, 915, 920 MHz* | 868, 915, 920 MHz* |
| Max connected sensors | 10 | 30 | 30 | 20 | 20 |
| Data memory ** | 25 days (step 1 hour) | 25 days (step 1 hour) | 25 days (step 1 hour) | Up to 80 days (step 5 min) | Up to 80 days (step 5 min) |
| Power supply | 5 V DC | 5 V DC | 5 V DC | 5 V DC | 5 V DC |
| Dimensions | 66×66×28 mm | 66×66×28 mm | 66×66×28 mm | 66×66×28 mm | 66×66×28 mm |
| Supported sensors | S1 Pro D3 Pro L3 Pro |
S1 LR D3 LR L3 LR |
S1 SLR D3 SLR L3 SLR |
D3 LR TS L3 LR TS |
D3 SLR TS L3 SLR TS |
| Supported LED screens | no | no | no | LED-391 LR TS | LED-391 SLR TS |
* Modifications for 915 MHz and 920 MHz are available upon special order.
** Data memory allocation is described in more detail in the Data memory allocation section.
Device overview
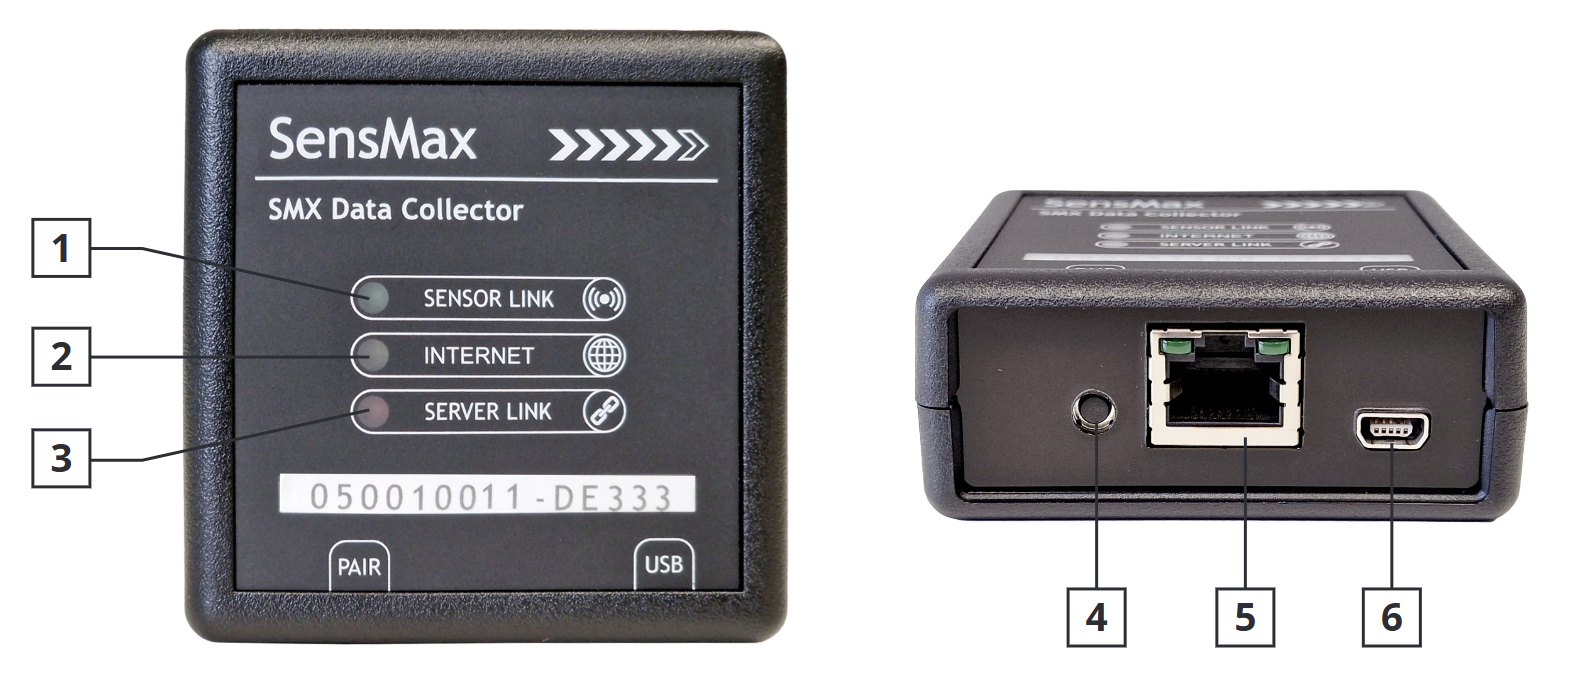
| Icon / Component | Status | Description |
|---|---|---|
| [1] SENSOR LINK | On | Connection with sensor established |
| Blinks 3 times per second | Searching for new sensor | |
| Blinks 1 time per second | Active sensors detected | |
| [2] INTERNET | On | Connected to the Internet |
| Blinks 1 time per second | Trying to connect to the Internet | |
| [3] SERVER LINK | On | Connection with server established |
| [4] PAIRING button | Short press | Start pairing with sensors |
| Press and hold for 10 sec | Remove all paired sensors | |
| Press and hold for 30 sec | Factory Reset | |
| [5] ETHERNET port | N/A | RJ-45 Ethernet connector |
| [6] USB mini port | N/A | Power connector |
Data memory allocation
SensMax SMX data collectors are equipped with non-volatile memory, allowing sensor data to be stored in the absence of an Internet connection. Once the connection is restored, the device automatically transmits all accumulated data to the server.
Data memory allocation depends on the device model.
TS-MODELS (SensMax SMX LR TS, SensMax SMX SLR TS)
All TS-models have up to 80 memory blocks, with each block storing 24 hours of data with 5-minute intervals. However, memory blocks are distributed among the connected sensors: D3 TS bidirectional sensors use 2 memory blocks each, and L3 TS loyalty buttons occupy 3 blocks each.
For example, if one D3 TS sensor is connected, the data collector can store up to 40 days of data with 5-minute intervals. If 10 D3 TS sensors are connected, the collector will be able to store up to 4 days of data for each sensor.
non-TS MODELS (SensMax SMX LR, SensMax SMX SLR, SensMax SMX PRO)
All non-TS models, regardless of the number and type of connected sensors, can store data up to 25 days with an interval of 1 hour.
Settings web page
All device settings are accessible on the built-in settings web page. There are several ways to access the settings page:
Accessing settings page via Ethernet
- Connect the SensMax SMX data collector to a power source.
- Connect the SensMax SMX data collector to your Ethernet network using an RJ-45 cable.
- Connect your laptop or smartphone to the same network.
- Open a web browser and type in the address bar:
http://xxxxxxxxx.local(wherexxxxxxxxxis the collector's serial number. For example,http://051002363.local).
Accessing settings page via Wi-Fi AP (access point)
- Connect the SensMax SMX data collector to a power source.
- Search for available Wi-Fi networks on your laptop or mobile phone.
- Connect to the collector's access point (AP name: "SensMax XXXXXXXXX"). The default password is the same as the collector's serial number. For example, if the collector's access point is named
SensMax 051002363, the default password will be051002363. - Open a web browser.
- Type the IP address
192.168.10.1into the address bar and press Enter.
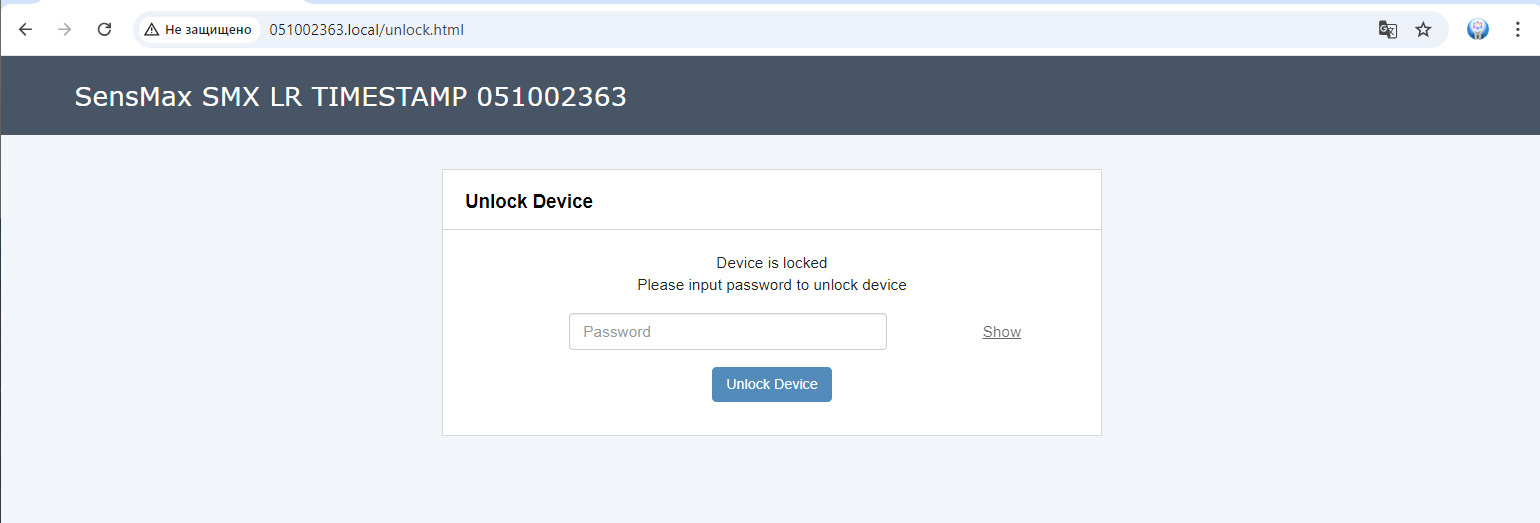
After the settings page loads, a login page will appear. To unlock the settings, enter the password again (for this example, the password is 051002363).
Home
This tab displays all connected sensors and their status. Also on this page you can manage all sensor connections.
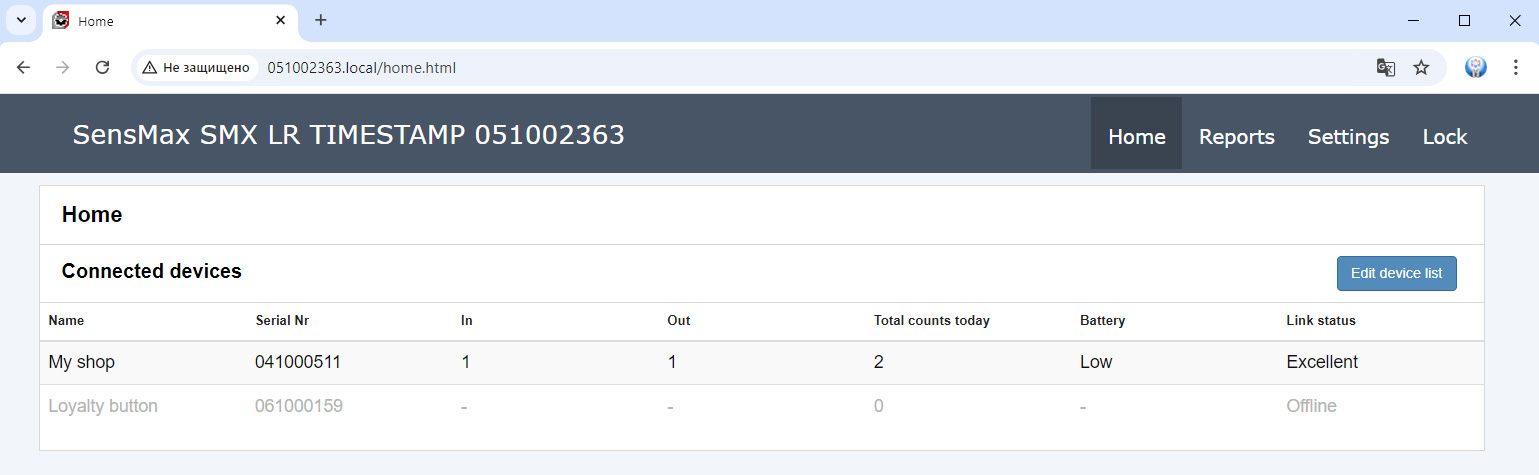
Editing connected devices
Click the Edit device list button to configure and manage connected sensors.
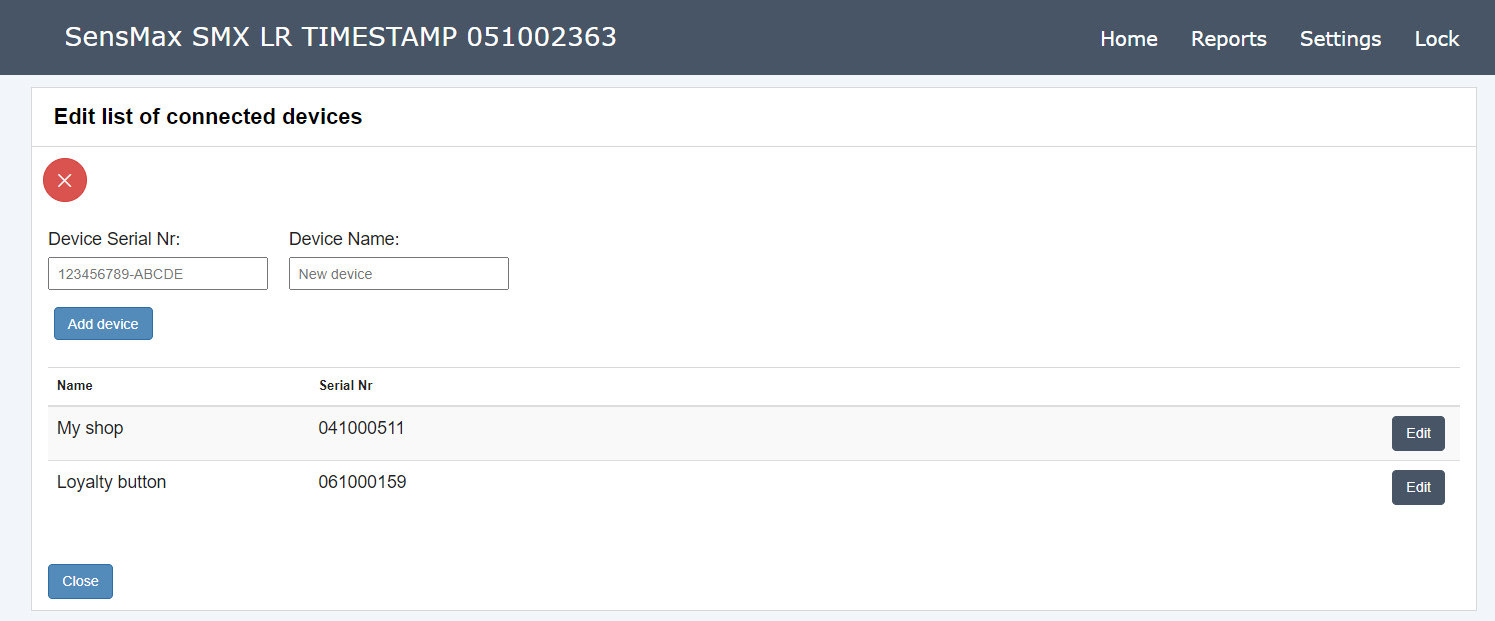
To add a new sensor, click this button and enter the sensor's serial number and security code. Both are printed on the sensor housing.
If you cannot find the security code, you can add the sensor manually. Please refer to the Pairing the sensor manually section of this user manual.
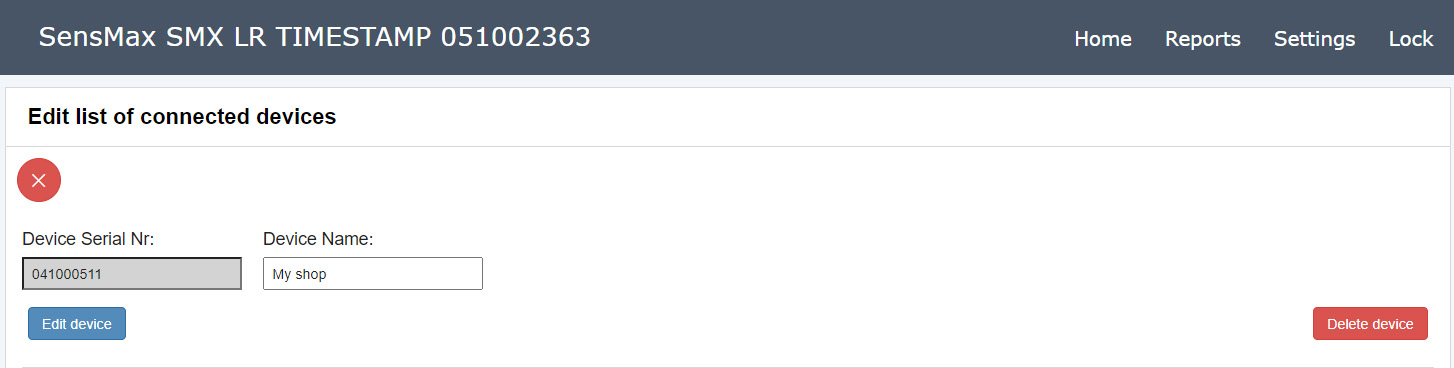
By clicking the Edit button next to a connected sensor, you can change its name or remove the pairing with the sensor.
Settings
Click on the Settings tab in the top menu of the page to go to the settings.
Wi-Fi Settings
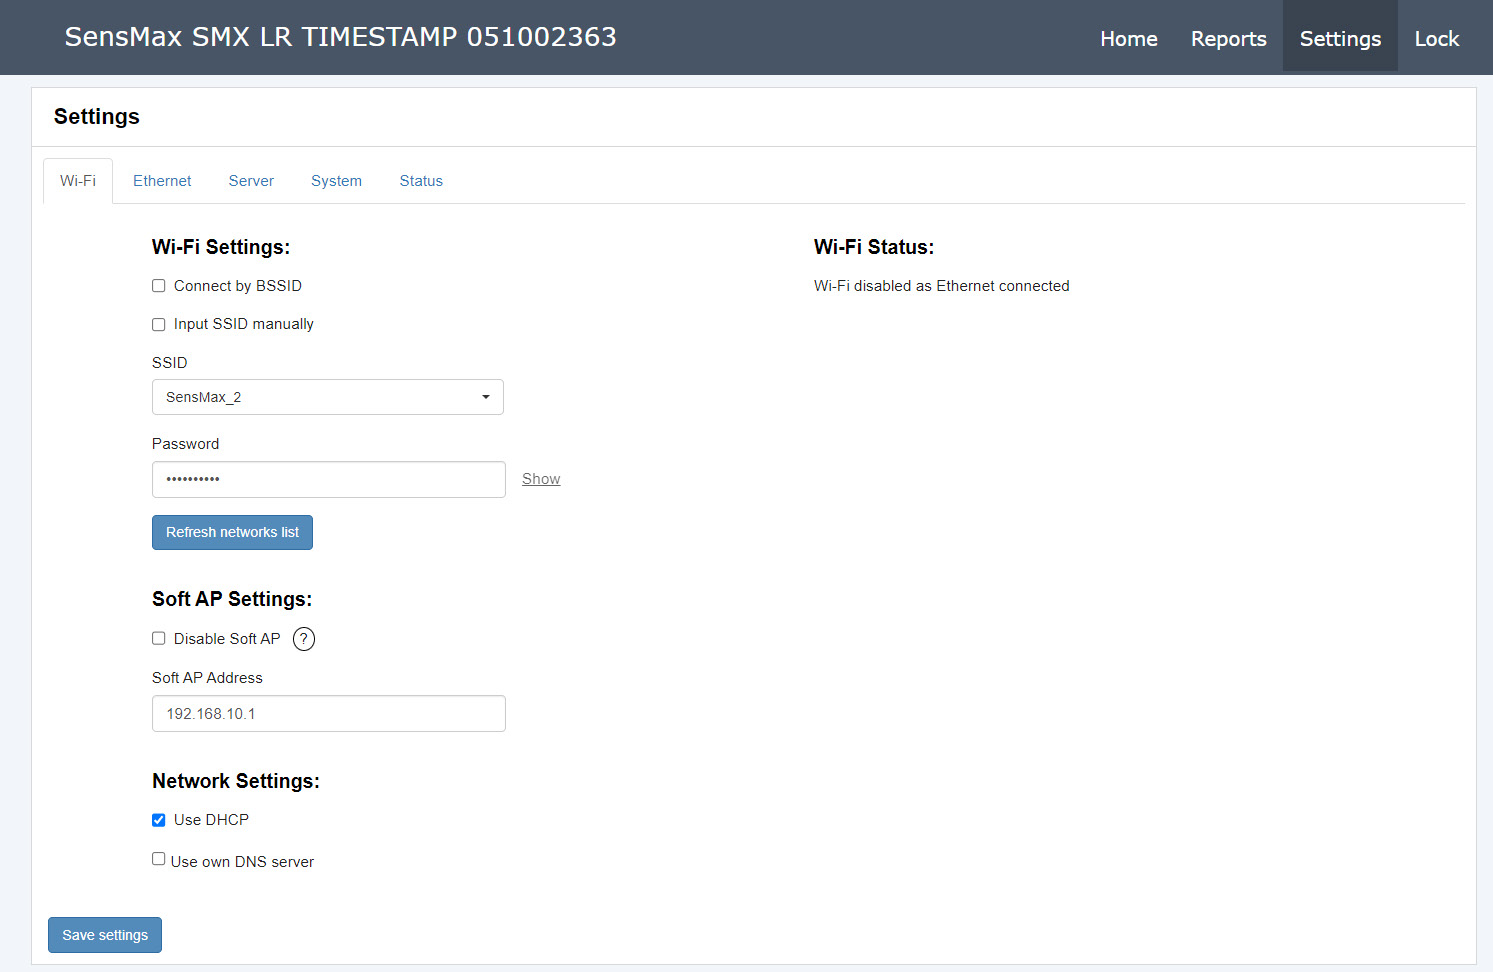
This tab allows you to configure Wi-Fi connection settings. Click on the Wi-Fi tab to go to Wi-Fi settings.
| Setting | Description |
|---|---|
| Connect by BSSID | If the Connect by BSSID setting is enabled, the device will connect to a specific network by its MAC address. This can be useful if the scan finds multiple networks with the same name. |
| Input SSID manually | To connect to a hidden Wi-Fi network, check the Input SSID manually box and enter the SSID name and password manually. |
| Scan networks | To find nearby Wi-Fi networks, click the Scan Networks button. After a few seconds, all found networks will be displayed in the SSID list. Select the desired Wi-Fi network and enter the password. |
| Soft AP Settings | If the Soft AP function is enabled, the user can connect directly to the device using its Wi-Fi access point. The user can change the IP address of the access point. Note: If the collector is simultaneously connected to the user's Wi-Fi network and its own AP is enabled, their subnet addresses must be different. You cannot use the same subnet address, otherwise the connection will be impossible. For example, if the user's Wi-Fi network has the address 192.168.1.X, you cannot set the Soft AP address in the 192.168.1.X range. |
| Use DHCP | DHCP allows you to automatically obtain all network settings from the connected Wi-Fi network. Disable DHCP if you want to enter network settings manually. |
| Use own DNS server | If enabled, this allows you to configure custom DNS servers. If disabled, Google DNS servers 8.8.4.4 and 8.8.8.8 are used. |
Ethernet Settings
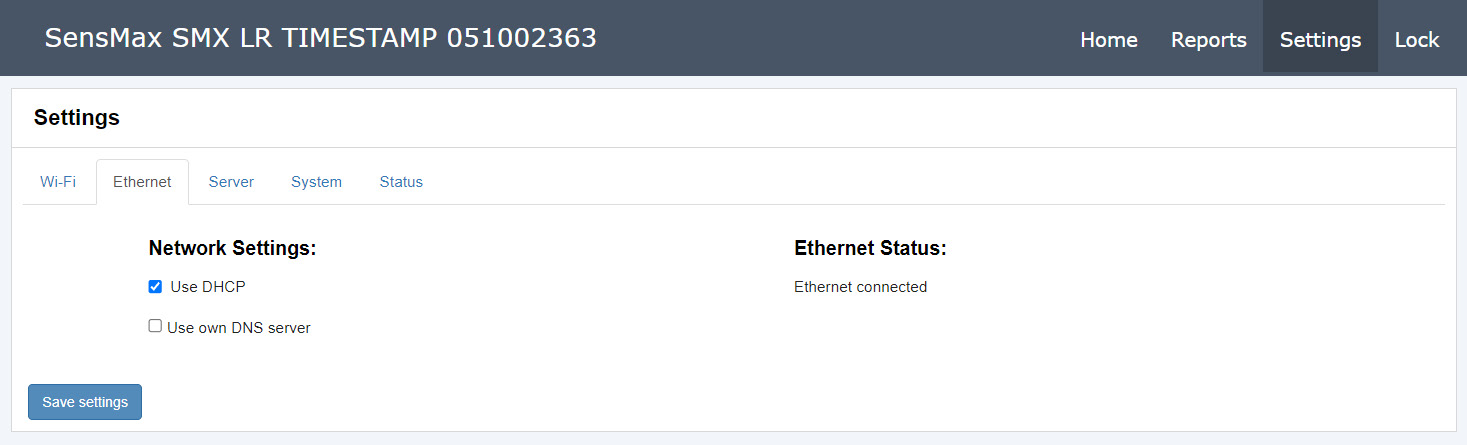
This tab allows you to configure Ethernet connection settings. Click on the Ethernet tab to go to Ethernet settings.
| Setting | Description |
|---|---|
| Use DHCP | DHCP allows you to automatically obtain all network settings from the connected Ethernet network. Disable DHCP if you want to enter network settings manually. |
| Use own DNS server | If enabled, this allows you to configure custom DNS servers. If disabled, Google DNS servers 8.8.4.4 and 8.8.8.8 are used. |
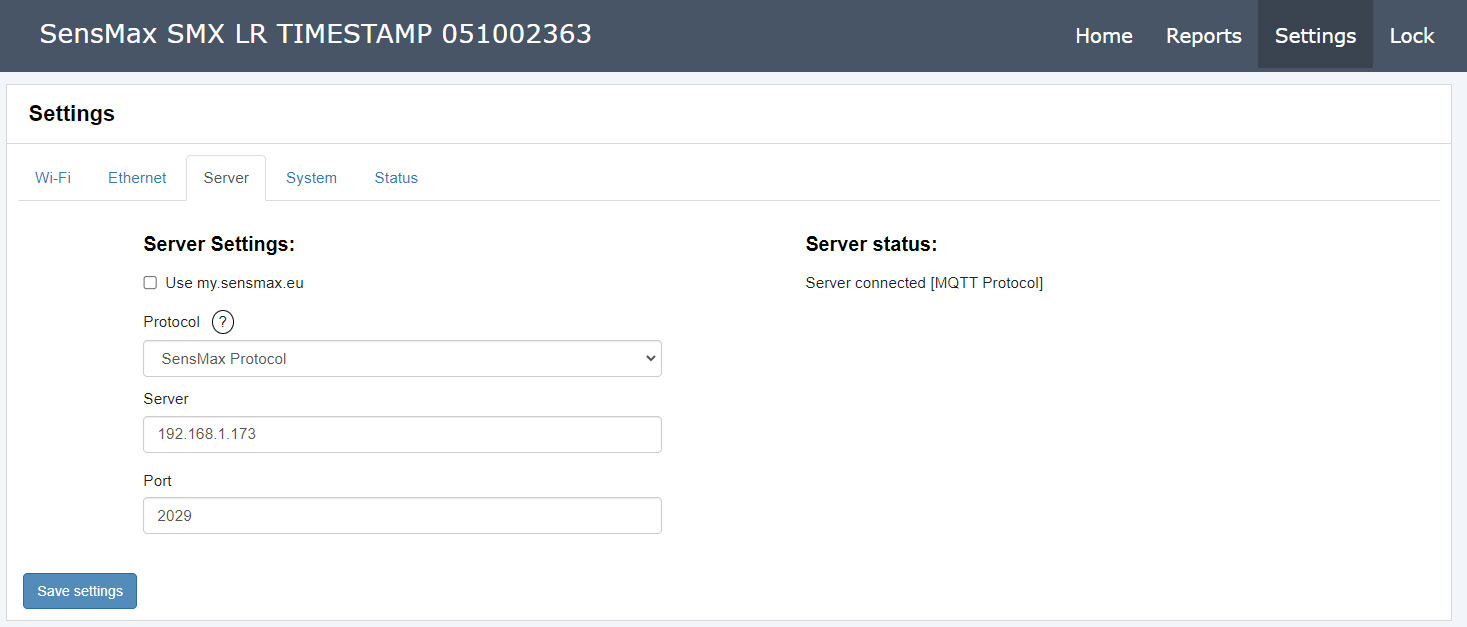
Server Settings
This tab allows you to configure connection settings to the server. Click on the Server tab to go to server settings.
- SensMax Cloud Application: To use the SensMax cloud application, enable the Use my.sensmax.eu option.
- Own Server: To connect to your own server, disable the Use my.sensmax.eu parameter and select the appropriate protocol.
- SensMax Protocol: The SensMax Protocol is used for communication with the "SensMax GPRS server" software.
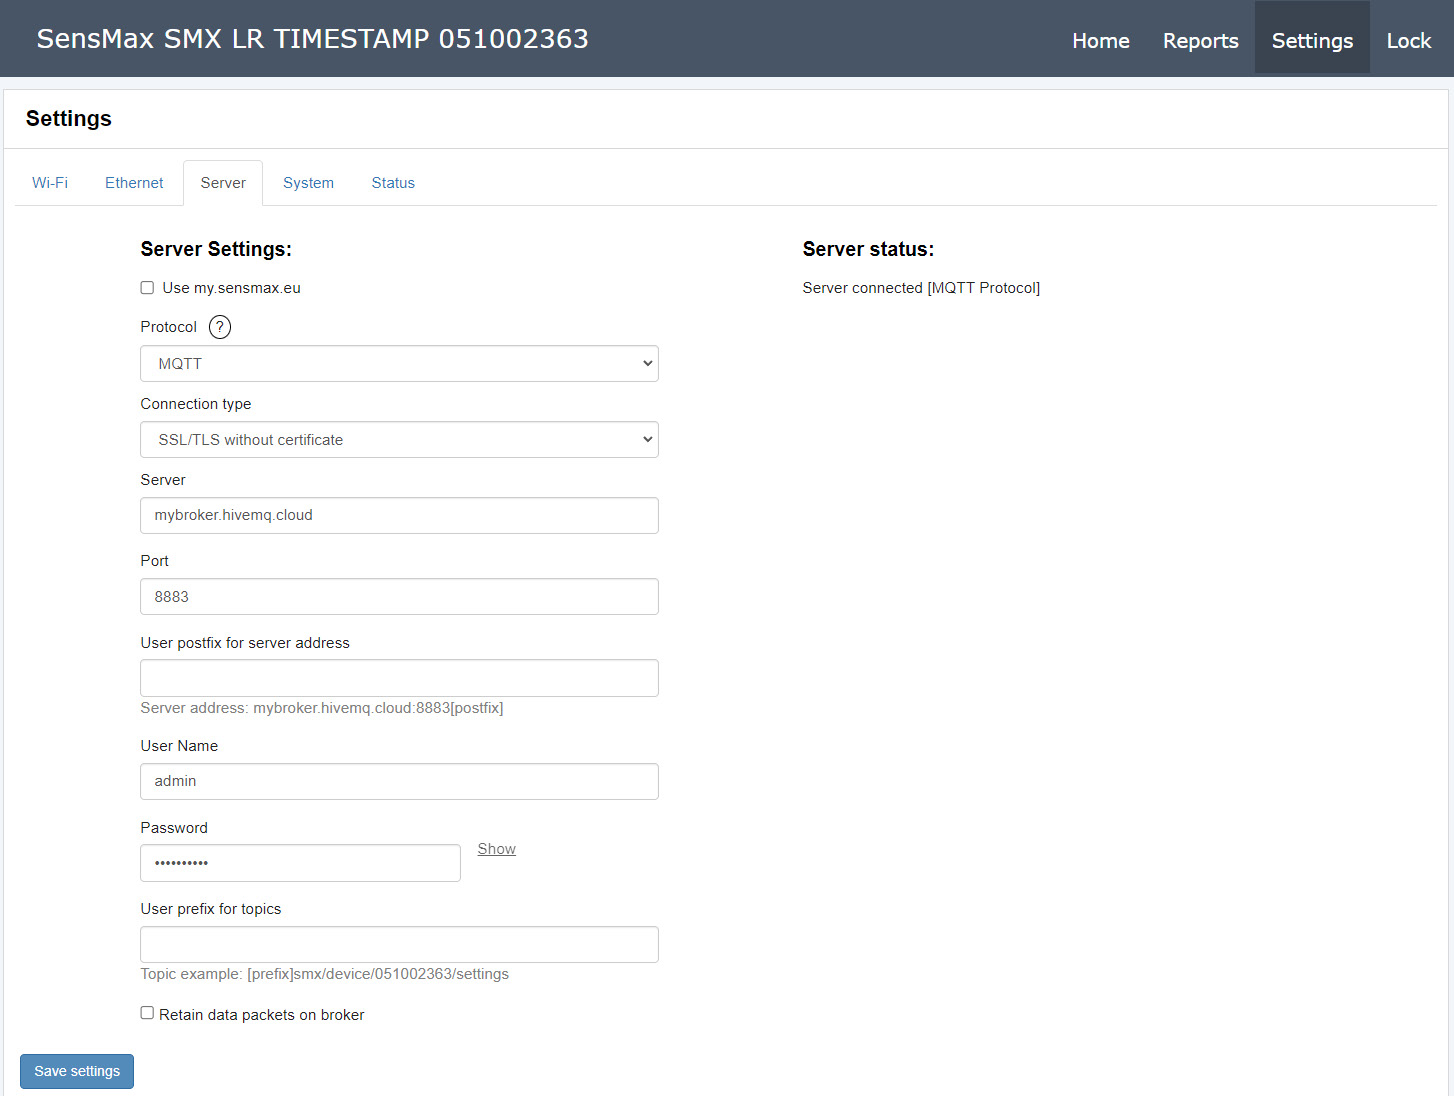
MQTT
The MQTT protocol provides modern, lightweight, and efficient data transfer.
To configure your own MQTT broker, use one of the possible configuration options:
- Credentials
- Mutual auth
- SSL/TLS
- WebSocket
- SSL/TLS without certificate
- WebSocket Secure
- Two-way auth
| Setting | Description |
|---|---|
| User prefix for topics | Optionally, the user can add any prefix to the topic name. Maximum length is 128 characters. |
| Retain data packets on broker | If enabled, data packets will be retained on the MQTT broker. See the MQTT documentation for more information. |
| User postfix for server address | Optionally, the user can add any postfix to the server address. Maximum length is 128 characters. |
System settings
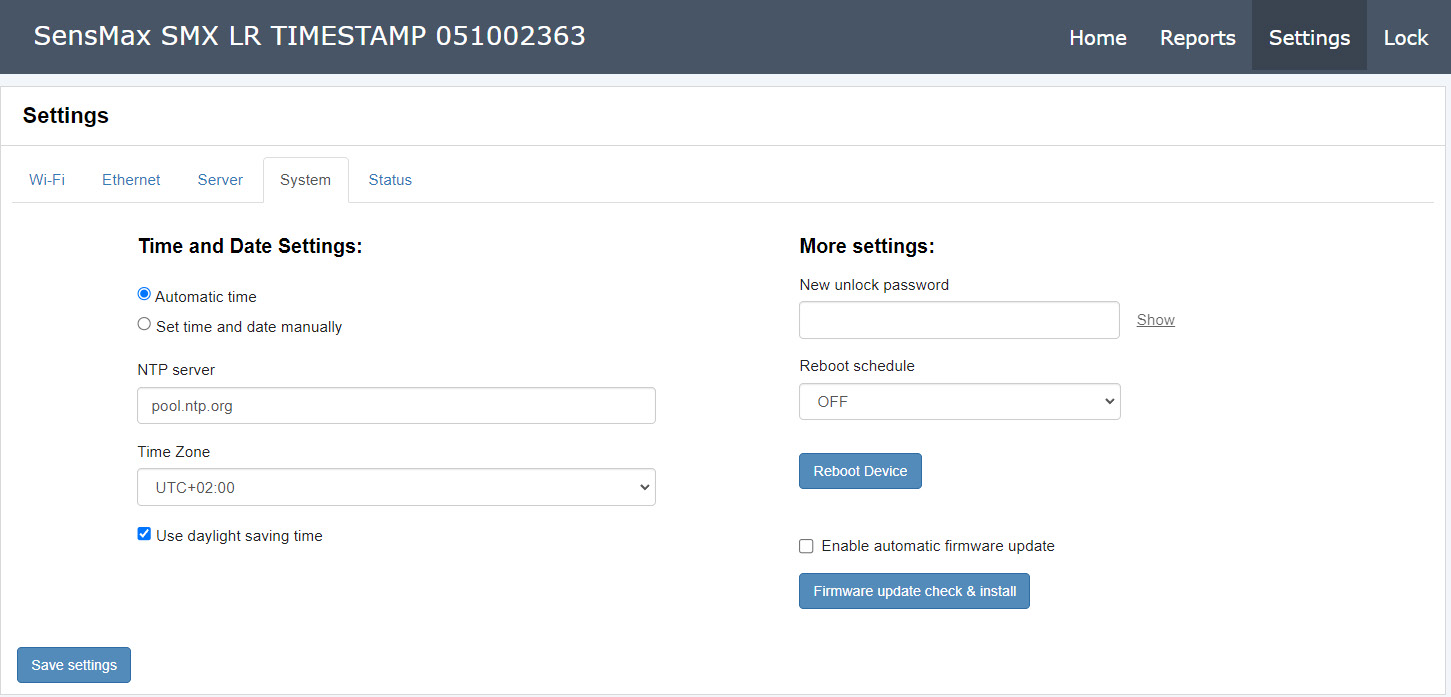
Click on the System tab to go to system settings.
| Setting | Description |
|---|---|
| Time and Date Settings | Depending on the selected server protocol, time settings vary. - For my.sensmax.eu, an external NTP server is used (default pool.ntp.org).- For the SensMax Server protocol, the device receives time settings from the "SensMax GPRS Server" software. - For MQTT, the user can choose to use an external NTP server or set the time manually. |
| New unlock password | Here you can change the password used for both the collector's access point and the settings page. We recommend changing the password if you are still using the default password. |
| Reboot schedule | This setting allows you to set the time for daily reboot of the device. The OFF value disables scheduled reboot. |
| Reboot Device | This button triggers an immediate device reboot. |
| Enable automatic firmware update | If this option is selected, the device will periodically check for updates automatically. If this option is disabled, you can manually check for firmware updates. |
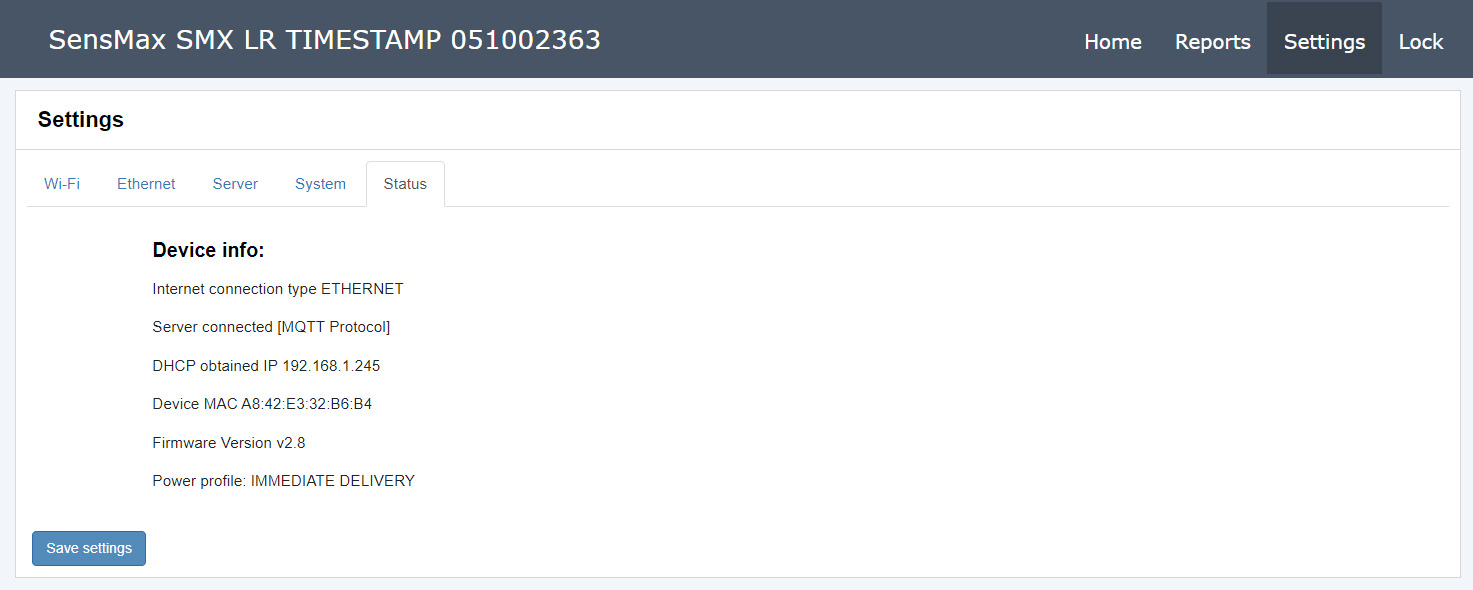
Status
This tab allows you to check the current status of the device.
Reports
Click on the Reports tab in the top menu of the page to go to reports. Only TS type devices support built-in reports.
Currently, only the LiveReport report type is supported. This report type is commonly used to display the number of visitors located inside the premises.
Reports are displayed on the device's web page and can also be transmitted via radio channel to compatible SensMax LED DISPLAY screens.
To create a new report, click the "+" button and enter a name for the report.
Click the Settings button on the created report to open additional settings:
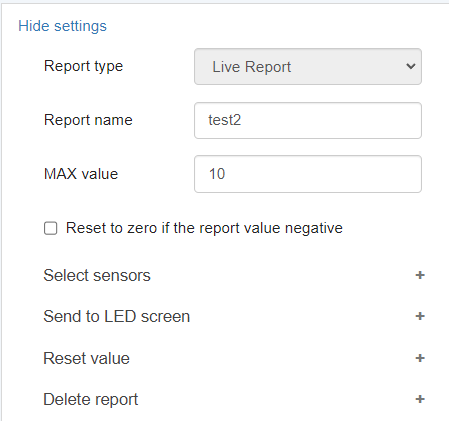
Report Settings
| Setting | Description |
|---|---|
| Report name | Name of the current report. |
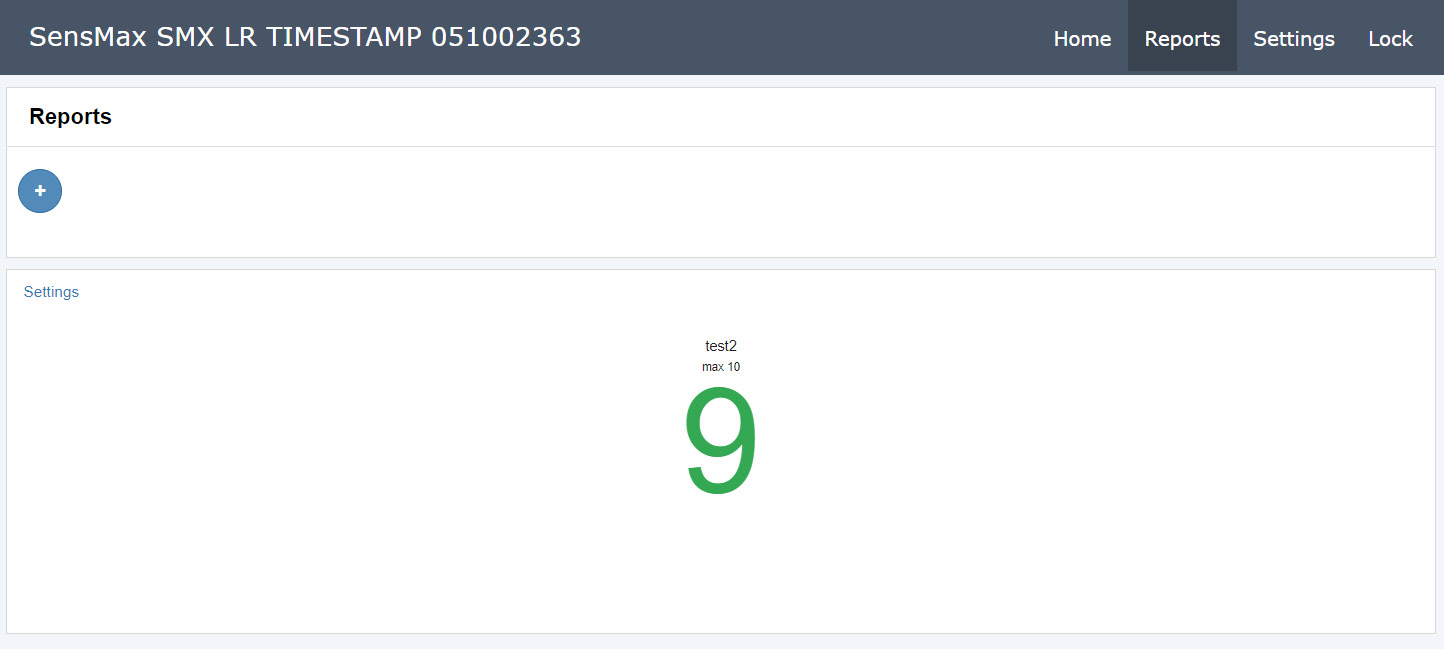
| MAX value | If the current report reading is below the MAX value, the report value is displayed in green. If the report value is greater than or equal to the MAX value, it is displayed in red. |
| Reset to zero if the report value negative | If enabled, the report will not show negative values. Instead, zero will be displayed. |
| Select sensors | Allows you to select sensors for the report. The report value is calculated using the formula: VALUE = IN - OUT. The report displays the difference of all selected IN and OUT.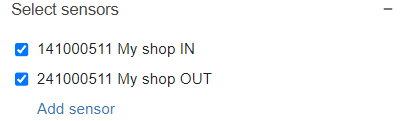 |
| Send to LED screen | Allows you to select wireless LED screens to which the report will be sent.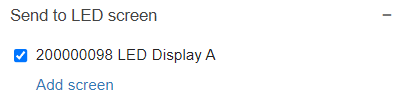 |
| Reset value | Allows you to reset report readings to the specified value.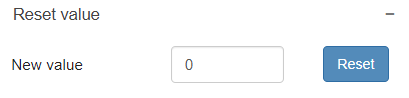 |
| Delete report | Allows you to delete the current report. |
Example of created report
Below is an example of a created report:
Pairing the sensor manually
Each sensor must be paired with its collector. To pair sensors with the collector, the following steps must be performed:
- Insert batteries into the sensor.
- Connect the collector to a power supply / USB.
- Press the pairing button on the collector.
- Press the pairing button located inside the sensor housing.
Note: An alternative way to pair a new sensor with the data collector is to use the settings web page (this method is described in the Home page section).
Ordering Information
Important: Radio frequency compatibility
When ordering equipment (sensors and gateways), make sure they work on the same radio frequency. By default, LR, SLR, and TS devices are shipped tuned to 868 MHz. If you require modifications for 915 MHz or 920 MHz, be sure to specify this when ordering (for example: SensMax SMX LR - 915 MHz). Equipment with different frequencies will not be able to communicate with each other.
Data collectors (gateways)
| Model / Part Number | Description | Compatible devices |
|---|---|---|
| SensMax SMX PRO | Wireless data collector (Ethernet/Wi-Fi AP) | SensMax D3 Pro, SensMax S1 Pro, SensMax L3 Pro |
| SensMax SMX LR | Wireless data collector Long Range (Ethernet/Wi-Fi AP) | SensMax D3 LR, SensMax S1 LR, SensMax L3 LR |
| SensMax SMX SLR | Wireless data collector Super Long Range (Ethernet/Wi-Fi AP) | SensMax D3 SLR, SensMax S1 SLR, SensMax L3 SLR |
| SensMax SMX LR TS | Wireless real-time data collector (Ethernet/Wi-Fi AP) | SensMax D3 LR TS, SensMax L3 LR TS |
| SensMax SMX SLR TS | Wireless real-time data collector Super Long Range (Ethernet/Wi-Fi AP) | SensMax D3 SLR TS, SensMax L3 SLR TS |
Contact information
- Phone: +371 67553110
- Email: office@sensmax.lv
- Website: www.sensmax.eu
- Telegram: t.me/sensmax
- Facebook: www.facebook.com/sensmaxmanufacturer
- LinkedIn: www.linkedin.com/company/sensmax
SensMax is a registered trademark. SensMax reserves the right to make changes to the products described herein without prior notice. The information contained in this publication regarding device applications and the like is provided solely for your convenience. SensMax disclaims all liability arising from this information and its use. The use of SensMax devices in life-support and/or safety-critical applications is entirely at the buyer's risk, and the buyer agrees to defend, indemnify, and hold harmless SensMax against any and all damages, claims, suits, or expenses arising from such use. No licenses are conveyed, implicitly or otherwise, under any intellectual property rights of SensMax.