TAC-B EWP Built-in Relay: Extended Manual
The SensMax TAC-B EWP radar sensor is equipped with a built-in "Dry Contact" relay. This hardware feature allows the sensor to interact directly with external equipment - automation systems, sound sirens, lighting, or smart building controllers, without the use of complex software integrations or third-party servers.
In this manual, we will break down the internal logic of the relay, priority rules, and the basic steps for configuring it.
Technical Specifications
- Relay type: Dry Contact
- Maximum switching load:
- 0.5A at 250V AC
- 1A at 30V DC
Wiring Diagram
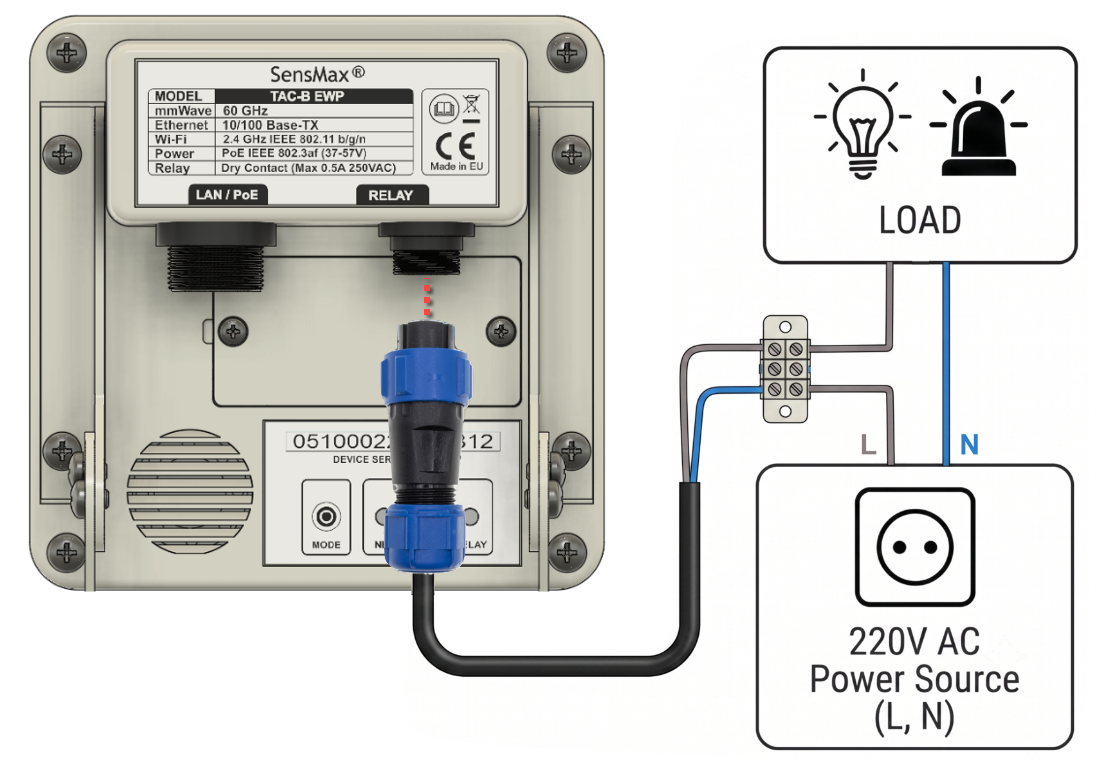
To physically connect external equipment to the built-in relay contacts, a waterproof SP13 connector is used, which is included in the standard sensor kit.
Installation recommendations:
- Before starting work, ensure that the power to the sensor and the connected external device is completely turned off.
- Refer to the diagram below to determine which exact two pins of the SP13 connector are designed for connecting the relay.
- Strip the wires and securely fix them in the contacts. Since the relay operates on a "dry contact" principle, polarity does not matter - the wires can be connected in any order.
- Tighten the fixing nut of the connector to ensure a reliable connection and maintain the tightness of the enclosure.
Software Configuration and Control
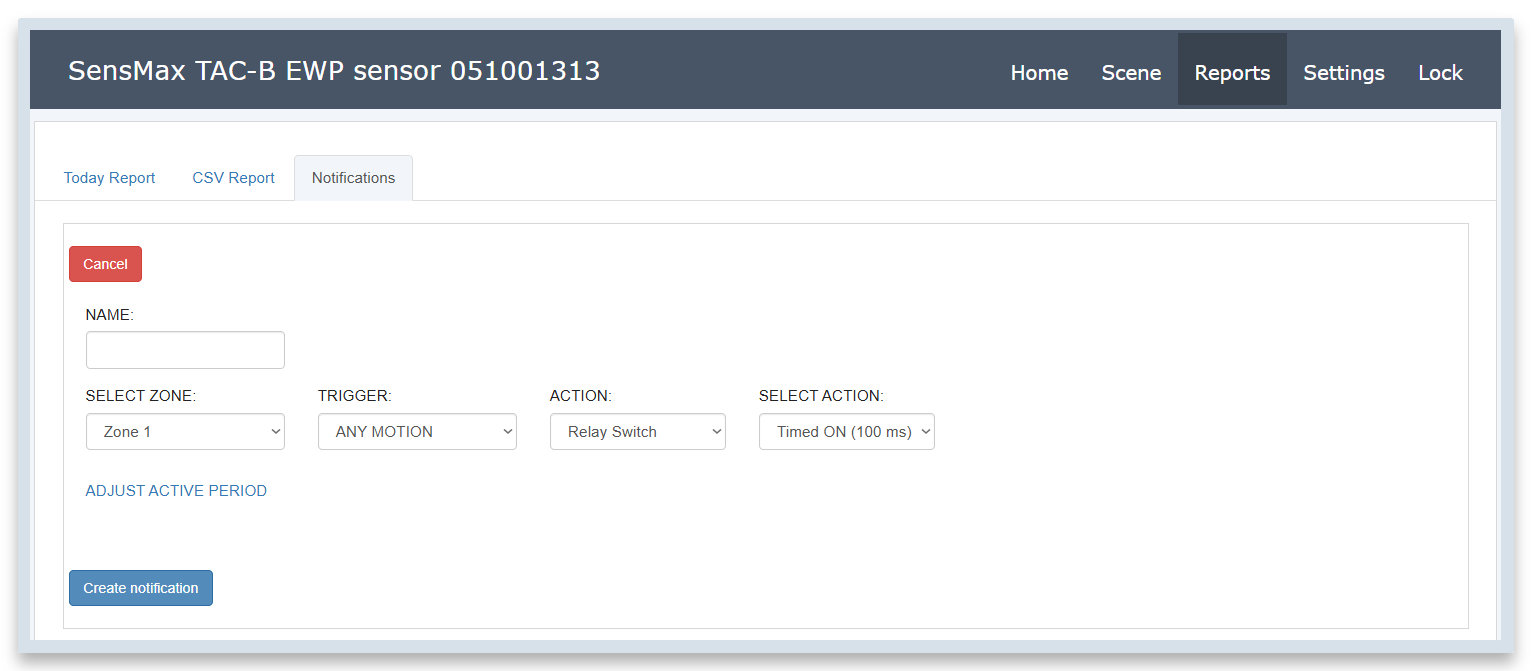
The built-in relay is controlled via the Notifications functionality in the sensor's web interface. To configure, go to the Reports page, open the Notifications tab, and click the Create notification button.
In the TAC-B EWP, the user can create "notifications" - customizable triggers that are flexibly linked to any Zone or Gate.
Various metrics are available for setting up a trigger, such as:
- INCOMING
- OUTGOING
- PASSAGES
- ANY MOTION and many others.
For some metrics, additional fine-tuning parameters are provided. For example, for VISITORS, you can set a logical condition MORE THAN or EVERY NEXT, specifying a specific quantity.
As an output for the created notification, you can assign various actions: sending an Email, a message in Telegram, playing a sound, and including - activating the Relay. Thus, any event recorded by the sensor can automatically close the relay contacts and control external equipment.
When selecting a relay as an action (SELECT ACTION), you will be prompted to configure its triggering mode. Both continuous switching and activation for a specified time interval are available:
- Relay ON - turn the relay on continuously (until a new command is received).
- Relay OFF - forcefully turn off the relay.
- Relay TOGGLE - switch the current state of the relay to the opposite.
- Timed ON - turn the relay on for a strictly specified time, after which it will automatically turn off. Available intervals: 100 ms, 1 sec, 5 sec, 10 sec, 1 min, 5 min, 10 min, and 1 hour. Choosing short intervals (e.g., 100 ms) is ideal for sending pulses to external hardware counters or controllers.
Configuration Example: Below is an example of configuring a notification for "Zone 1". In this case, the relay will issue a short pulse lasting 100 ms every time an incoming or outgoing object is registered in Zone 1.
Operating Algorithms
The built-in relay supports various scenarios for controlling external devices (for example, sirens, lighting, or external counters). For stable operation, three main modes are provided:
1. Short pulse mode (up to 1 second)
- Purpose: Accurate data transmission (for example, about people passages) to external pulse counters.
- How it works: If the sensor detects several passages in a row at once, it does not try to transmit them all simultaneously. Instead, the relay "remembers" these events (up to 128 events) and transmits them one by one in the form of short signals. A short pause is maintained between each signal so that the external device has time to read them correctly. If the memory is full, new events are temporarily ignored until space is freed up.
2. Long hold mode (more than 1 second)
- Purpose: Control of lighting, sirens, or ventilation systems when the relay needs to be turned on for a specified time.
- How it works: When triggered, the relay turns on for the time you specified. If the sensor detects activity in the zone again (while the relay is still on), the operating time is automatically extended - the timer starts counting again.
3. Continuous ON/OFF modes
- Purpose: Direct control of the relay when specified conditions are met. For example, turn on the light while there are people in the zone, and turn it off when the room is empty.
- How it works: The relay can be forced into a continuously ON or OFF state. A TOGGLE mode is also available, which simply changes the current relay state to the opposite.
Important priority rule
Commands for a long hold and continuous ON/OFF have the highest priority. If the relay is already turned on for a long time (for example, a siren is activated), then accidental short pulses that occur at this moment will be ignored so as not to interfere with the main operation of the relay.
We wish you successful configuration and operation of the SensMax TAC-B EWP! Full technical documentation and sensor specifications are available in the Technical Specification section.
Contacts
- Phone: +371 67553110
- Email: office@sensmax.lv
- Website: www.sensmax.eu
- Telegram: t.me/sensmax
- Facebook: facebook.com/sensmaxmanufacturer
- LinkedIn: linkedin.com/company/sensmax
SensMax is a registered trademark. SensMax reserves the right to make changes to the products described herein without notice. Information contained in this publication regarding device applications and the like is provided only for your convenience. SensMax disclaims all liability arising from this information and its use. The use of SensMax devices in life support and/or critical safety systems is entirely at the buyer's risk, and the buyer agrees to defend, indemnify and hold SensMax harmless from any and all damages, claims, suits, or expenses resulting from such use. No licenses are conveyed, implicitly or otherwise, under any SensMax intellectual property rights.